Craftsman 28195 Product Manual - Page 30
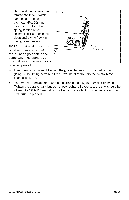
screw A, Fig. 21
 |
View all Craftsman 28195 manuals
Add to My Manuals
Save this manual to your list of manuals |
Page 30 highlights
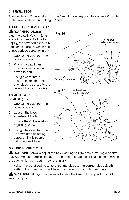
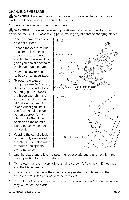
CHANGING THE BLADE ,_ WARNING: Be sure to wear protective work gloves while handling a saw blade. The blade can injure unprotected hands. 1. Unplug the saw from the power source. WARNING: To prevent personal injury, ALWAYS disconnect the plug from power source BEFORE assembling parts, making adjustments or changing blades. 2. Place the saw, on its side, on a flat surface. Fig. 21 3. Loosen the depth-of-cut adjustment lever, raise the saw up all the way, and tighten the lever. This gives you easier access to the blade mounting area. 4. Place the saw upright on its base on a flat surface. Outer "D" Washer 5. To loosen the spindleclamping screw "A," Fig. 21, depress the spindle-lock button (Fig. 21a). Insert the blade wrench in the spindle clamping screw "A." Move the wrench in and out slightly until you feel the spindle lock button depress further, which locks the blade in position so the spindle clamping screw can be removed. "A" Spindle Clamping Screw Fig. 21a Blade Rotation teeth point up at front 6. Keeping the spindle lock button firmly depressed, turn the wrench clockwise to remove the spindleclamping screw. SpindleLock Button 7. Use the blade-guard lever to raise the lower blade guard and hold it in the raised position for the next steps. 8. Completely remove the spindle-clamping and the blade (see Fig. 21). screw "A," the outer "D" washer, 9. The remaining washer is the inner bushing washer that fits around the spindle shaft; it does not need to be removed. 10. Put a drop of oil onto the inner bushing washer and outer "D" washer where they will touch the blade. 28195 Manual_Revised_07-0623 Page 30
-
 1
1 -
2
-
3
-
4
-
5
-
6
-
7
-
8
-
9
-
10
-
11
-
12
-
13
-
14
-
15
-
16
-
17
-
18
-
19
-
20
-
21
-
22
-
23
-
24
-
 25
25 -
 26
26 -
 27
27 -
 28
28 -
 29
29 -
 30
30 -
 31
31 -
 32
32 -
 33
33 -
 34
34 -
 35
35 -
36
 |
 |
