Craftsman 28945 Operation Manual - Page 8
REQUIRED, ASSEMBLY, REMOVE, TRACTOR, CARTON, OFF SKID, Operation, location, function, - tools
 |
View all Craftsman 28945 manuals
Add to My Manuals
Save this manual to your list of manuals |
Page 8 highlights
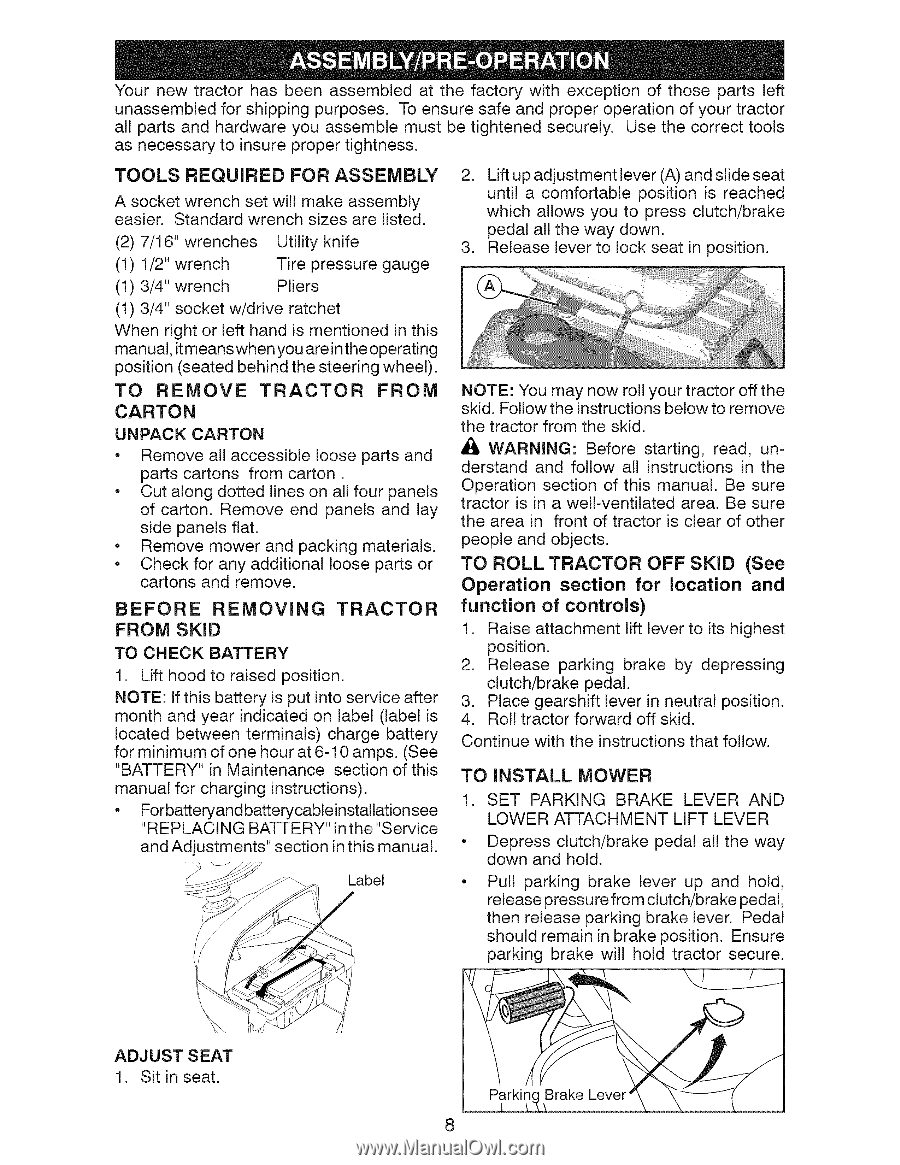
Your new tractor has been assembled at the factory with exception of those parts left unassembledfor shipping purposes. To ensure safe and proper operationof your tractor all parts and hardware you assemble must be tightened securely. Use the correct tools as necessaryto insure proper tightness. TOOLS REQUIRED FOR ASSEMBLY A socket wrench set will make assembly easier. Standard wrench sizes are listed. (2) 7/16" wrenches Utility knife (1) 1/2" wrench Tire pressure gauge (1) 3/4" wrench Pliers (1) 3/4" socket w/drive ratchet When right or left hand is mentioned in this manual, it means when you are in the operating position (seated behind the steering wheel). TO REMOVE TRACTOR FROM CARTON UNPACK CARTON • Remove all accessible loose parts and parts cartons from carton. • Cut along dotted lines on all four panels of carton. Remove end panels and lay side panels flat. • Remove mower and packing materials. • Check for any additional loose parts or cartons and remove. BEFORE REMOVING FROM SKID TO CHECK BATTERY TRACTOR 1. Lift hood to raised position. NOTE: If this battery is put into service after month and year indicated on label (label is located between terminals) charge battery for minimum of one hour at 6-10 amps. (See "BATTERY" in Maintenance section of this manual for charging instructions). • Forbatteryand batterycableinstallationsee "REPLACING BATTERY" inthe "Service and Adjustments" section in this manual. Label 2. Lift up adjustment lever (A) and slide seat until a comfortable position is reached which allows you to press clutch/brake pedal all the way down. 3. Release lever to lock seat in position. NOTE: You may now roll your tractor offthe skid. Follow the instructions below to remove the tractor from the skid. Al_ WARNING: Before starting, read, understand and follow all instructions in the Operation section of this manual. Be sure tractor is in a well-ventilated area. Be sure the area in front of tractor is clear of other people and objects. TO ROLL TRACTOR OFF SKID (See Operation section for location and function of controls) 1. Raise attachment lift lever to its highest position. 2. Release parking brake by depressing clutch/brake pedal. 3. Place gearshift lever in neutral position. 4. Roll tractor forward off skid. Continue with the instructions that follow. TO INSTALL MOWER 1. SET PARKING BRAKE LEVER AND LOWER ATTACHMENT LIFT LEVER • Depress clutch/brake down and hold. pedal all the way Pull parking brake lever up and hold, release pressure from clutch/brake pedal, then release parking brake lever. Pedal should remain in brake position. Ensure parking brake will hold tractor secure. ADJUST SEAT 1. Sit in seat. Brake 8
-
 1
1 -
2
-
 3
3 -
 4
4 -
 5
5 -
 6
6 -
 7
7 -
 8
8 -
 9
9 -
 10
10 -
 11
11 -
 12
12 -
 13
13 -
14
-
15
-
16
-
17
-
18
-
19
-
20
-
21
-
22
-
23
-
24
-
25
-
26
-
27
-
28
-
29
-
30
-
31
-
32
-
33
-
34
-
35
-
36
-
37
-
38
-
39
-
40
-
41
-
42
-
43
-
44
-
45
-
46
-
47
-
48
-
49
-
50
-
51
-
52
-
53
-
54
-
55
-
56
-
57
-
58
-
59
-
60
-
61
-
62
-
63
-
64
-
65
-
66
-
67
-
68
-
69
-
70
-
71
-
72
 |
 |