Cub Cadet GTX 1054 Garden Tractor GTX 1054 Operator's Manual - Page 11
Adjusting the Seat, Gas and Oil
 |
View all Cub Cadet GTX 1054 Garden Tractor manuals
Add to My Manuals
Save this manual to your list of manuals |
Page 11 highlights
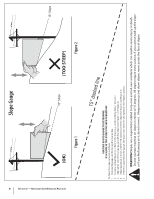
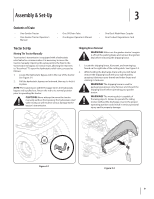
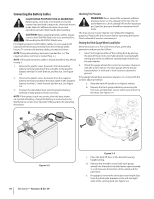
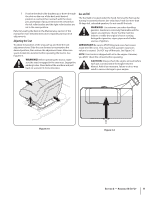
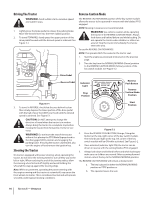
f. Position the deck roller brackets up or down through the slots on the rear of the deck until desired position is reached, then reattach with the clevis pins and hairpin clips just removed. Be certain that the left roller bracket and the right roller bracket are set in the same position. Refer to Leveling the Deck in the Maintenance section of this manual for more detailed instructions regarding various deck adjustments. Adjusting the Seat To adjust the position of the seat, pull up and hold the seat adjustment lever. Slide the seat forward or rearward to the desired position; then release the adjustment lever. Make sure seat is locked into position before operating the tractor. See Figure 3-5. WARNING! Before operating the tractor, make sure the seat is engaged in the seat-stop. Engage the parking brake. Stand behind the machine and pull back on seat until it clicks into place. Gas and Oil The fuel tank is located under the hood. Remove the fuel cap by turning it counterclockwise. Use only clean, fresh (no more than 30 days old), unleaded gasoline. Do not overfill the tank. WARNING! Use extreme care when handling gasoline. Gasoline is extremely flammable and the vapors are explosive. Never fuel the machine indoors or while the engine is hot or running. Extinguish cigarettes, cigars, pipes and all other sources of ignition. IMPORTANT: Be sure to STOP filling tank once fuel is seen inside the filler neck. This ensures that a proper expansion volume is created. Do NOT top off the tank. See Figure 3-6. NOTE: Your tractor is shipped with oil in the engine. However, you MUST check the oil level before operating. CAUTION: Always check the engine oil level before each use as instructed in the Engine Owner's Manual. Add oil as necessary. Failure to do so may result in serious damage to your engine. Figure 3-5 Figure 3-6 Section 2 - Assembly & Set-Up 11
-
 1
1 -
2
-
3
-
4
-
5
-
 6
6 -
 7
7 -
 8
8 -
 9
9 -
 10
10 -
 11
11 -
 12
12 -
 13
13 -
 14
14 -
 15
15 -
 16
16 -
17
-
18
-
19
-
20
-
21
-
22
-
23
-
24
-
25
-
26
-
27
-
28
-
29
-
30
-
31
-
32
-
33
-
34
-
35
-
36
 |
 |