Cub Cadet PRO Z 160S EFI Owners Manual - Page 21
Off-Season Storage
 |
View all Cub Cadet PRO Z 160S EFI manuals
Add to My Manuals
Save this manual to your list of manuals |
Page 21 highlights
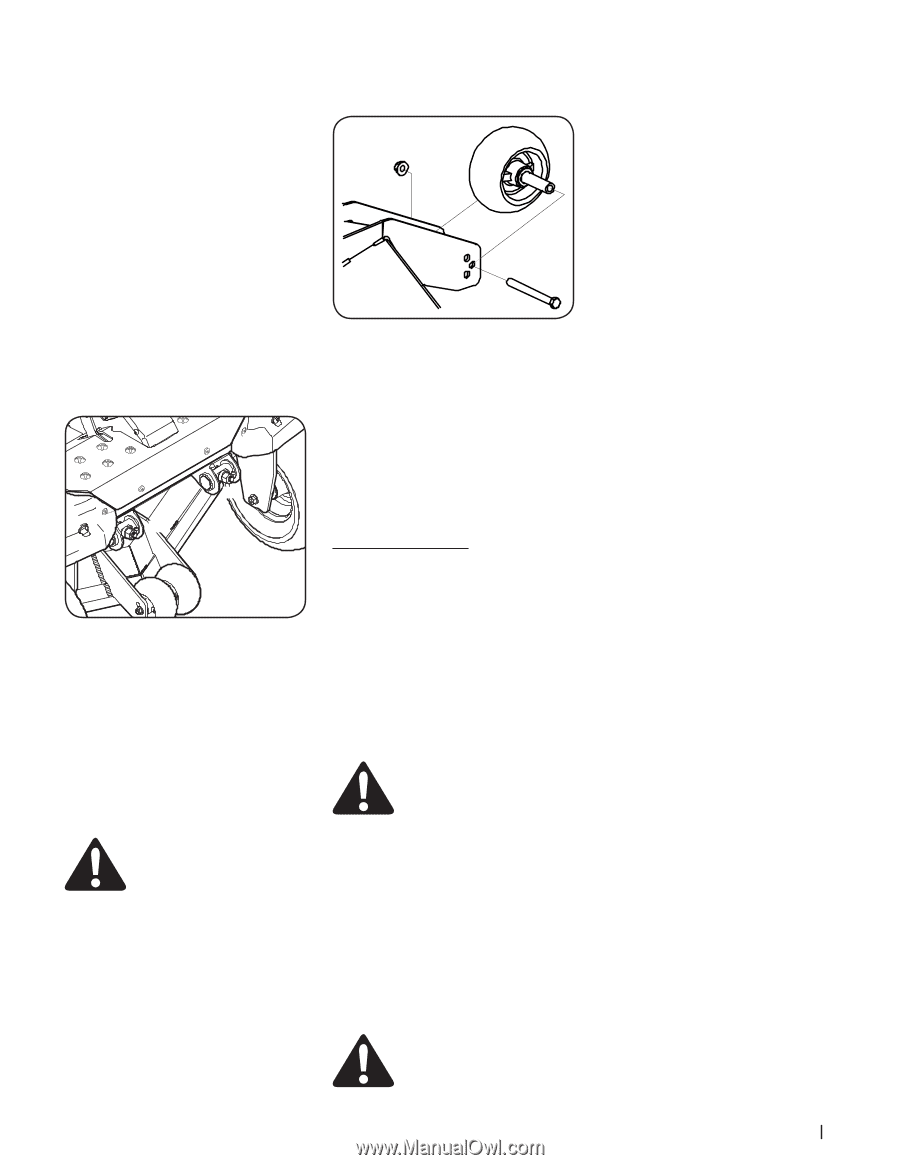
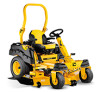
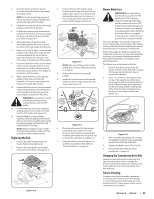
The front of the deck should be between 1⁄4-3⁄8" lower than the rear of the deck. Adjust if necessary as follows: 1. Park the tractor on a firm, level surface and place the deck lift handle in a middle position. 2. Rotate the blade nearest the discharge chute so that it is parallel with the tractor. 3. Measure the distance from the front of the blade tip to the ground and the rear of the blade tip to the ground. The first measurement taken should be between 1⁄4" and 3⁄8" less than the second measurement. 4. Determine the approximate distance necessary for proper adjustment and proceed, if necessary. 5. Using a wrench, raise the front of deck by loosening the lock nuts to the front of the pivot pin (a) and then tighten the jam nuts on the back of the pivot pin (a) to raise the front of the deck and secure in place. See Figure 4-8. (a) (a) Figure 4-8 6. Using a wrench, lower the front of deck by loosening the jam nuts on the back of the pivot pin (a) and then tighten the lock nut on the front of the pivot pin (a) to lower the front of the deck and secure in place. See Figure 4-8. 7. The deck is properly leveled when the front tip of the blade is 1⁄4" lower than the rear tip. Retighten the hex bolt on the left rear deck hanger links when proper adjustment is achieved. Adjusting the Front Gauge Wheels WARNING! Keep hands and feet away from the discharge opening of the cutting deck. The front gauge wheels on the mower deck are an anti-scalp feature, and should not ride on the ground. The front gauge wheels should be approximately 1⁄4-1⁄2" above the ground when the deck is set in the desired height setting. Using the deck lift handle, set the deck in the desired height setting, then check the gauge wheel distance from the ground below. If necessary adjust the front gauge wheels as follows: 1. Visually check the distance between the front gauge wheels and the ground. If the gauge wheels are near or touching the ground, they should be raised. If more than 1⁄2" above the ground, they should be lowered. 2. Remove the lock nut (a) securing one of the front gauge wheel (b) to the deck. Remove the front gauge wheel (b), hex screw (c) and spacer (d). See Figure 4-9. (b) (a) (d) (e) (c) Figure 4-9 NOTE: There are a pair of front gauge wheels on the nose of the 54" and 60" decks. 3. Insert the hex screw (c) into the one of three index holes in the front gauge wheel bracket (e) that will give the front gauge wheel (b) a 1⁄4-1⁄2" clearance with the ground. 4. Note the index hole of the just adjusted front auge wheel (b), and adjust the other front gauge wheel (b) into the respective index hole of the other front gauge wheel bracket (e). Off-Season Storage Riding Mower Storage If your riding mower is not going to be operated for an extended period of time (30 days to approximately six months), the riding mower should be prepared for storage. Store the riding mower in a dry and protected location. If stored outside, cover the riding mower (including the tires) to protect it from the elements. The procedures outlined below should be performed whenever the riding mower is placed in storage. 1. Change the engine oil and filter following the instructions provided in the Engine Operator's Manual. WARNING! Never store the riding mower with fuel in the tank indoors or in poorly ventilated enclosures, where fuel fumes may reach an open flame, spark or pilot light as on a furnace, water heater, clothes dryer, etc. 2. Service the engine as instructed in the separate Engine Operator's Manual. 3. Engines stored between 30 and 90 days need to be treated with a gasoline stabilizer and engines stored over 90 days need to be drained of fuel to prevent deterioration and gum from forming in fuel system or on essential carburetor parts. If the gasoline in your engine deteriorates during storage, you may need to have the carburetor, and other fuel system components, serviced or replaced. WARNING: Drain fuel only into unapproved container outdoors, away from an open flame. Allow engine to cool. Extinguish cigarettes, cigars, pipes, and other sources of ignition prior to draining fuel. 3. Remove the spark plugs and pour approximately one ounce of oil into each cylinder. Crank the engine one or two turns to spread the oil evenly on the cylinder walls. Replace the spark plugs. 4. Clean the engine and the entire riding mower thoroughly. NOTE: Use of a pressure washer or garden hose is not recommended to clean your riding mower. They may cause damage to electrical components, spindles, pulleys, bearings or the engine. The use of water will result in shortened life and reduce serviceability. 5. Sharpen the blades so that the mower will be ready to use when needed. 6. Protect the metal surfaces. Repair scratches with the appropriate touch-up spray paint. Brush a rust preventive oil on any unpainted surfaces including the pulleys and blades. (Be careful not to get any oil on the drive belts.) 7. Clean and fully charge the battery, then disconnect the negative cable at the battery to prevent possible discharge. Recharge the battery periodically when in storage. NOTE: Remove the battery if exposed to prolonged periods of sub-freezing temperatures. Store in a cool, dry location where temperatures are above freezing. 8. Lubricate all lubrication points. 9. Jack the mower up and store it on blocks to take the weight off of the tires. Removing the Riding Mower from Storage 1. Check the engine oil. 2. Fully charge the battery, lower riding mower off blocks, and inflate the tires to the recommended pressure. 3. Remove the spark plugs and wipe them off. Using the starter, crank the engine to pump the excess oil out of the spark plug holes. Replace the spark plugs and the ignition leads. 4. If drained before storing, fill the fuel tank with clean, fresh gasoline. 5. Check the level of the engine oil in the crankcase and the hydraulic reservoir tank. 6. Start the engine and allow to idle for a few minutes to ensure engine is operating properly. 7. Drive the riding mower without a load to make certain all the riding mower systems are functioning properly. Section 4 - Service 21
-
 1
1 -
2
-
3
-
4
-
5
-
6
-
7
-
8
-
9
-
10
-
11
-
12
-
13
-
14
-
15
-
 16
16 -
 17
17 -
 18
18 -
 19
19 -
 20
20 -
 21
21 -
 22
22 -
 23
23 -
 24
24 -
 25
25 -
 26
26 -
27
-
28
 |
 |