Cub Cadet PRO Z 160S EFI Owners Manual - Page 23
Replacing the Belt, Mower Blade Care, Changing the Transmission Drive Belt, Tractor Creeping
 |
View all Cub Cadet PRO Z 160S EFI manuals
Add to My Manuals
Save this manual to your list of manuals |
Page 23 highlights
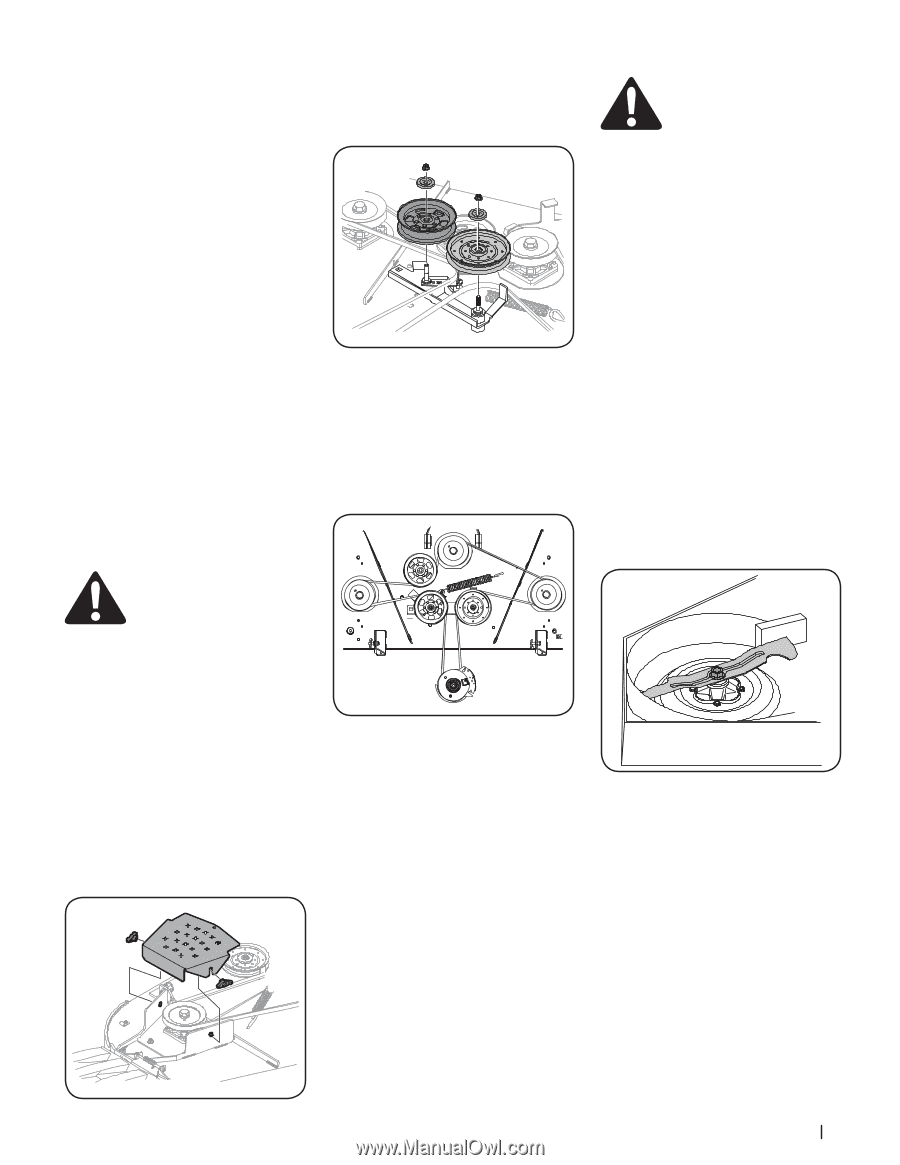
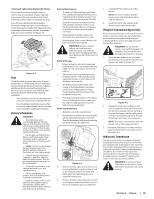
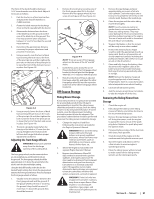
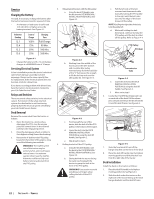
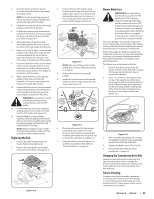
3. Once the deck is under the tractor, move the deck lift handle to the lowest mowing position. NOTE: To line the brackets up properly, it may be necessary to place a small block of wood under each side of the deck. 4. Hook the front deck lift rod onto the hanger brackets on the front of the deck. 5. Pull the deck release pins outward and maneuver the deck as necessary to align the holes in the deck lift arms with the pins. Refer to Figure 4-5. 6. When aligned, push each pin fully inward through the lift arms to secure the arms in the rear hanger bracket slots. 7. Make certain the 'V' belt is in the spindle pulleys on the deck; then route the belt rearward beneath the tractor frame, above the transmission tube(s), to the PTO pulley on the bottom of the engine. 8. Using the deck lift handle, raise the deck to the position that provides the most horizontal run of the belt between the deck idler pulleys and the PTO pulley on the bottom of the engine. 9. Make certain the belt is in the spindle pulleys of the deck, and that the backside of the belt is against both the fixed and movable idler pulleys. 10. Sitting behind the tractor, facing forward, make certain the belt is not twisted; then reach beneath the tractor to grasp the belt and pull it toward the PTO pulley. WARNING! Use caution to avoid pinching your fingers when rolling the belt onto the PTO pulley. 11. Pull the right side of the belt rearward and place the narrow V side of the belt into the PTO pulley. See Figure 4-4. 12. While holding the belt and pulley together, rotate the pulley to the left (See Figure 4-4). Continue holding and rotating the pulley and belt until the belt is fully rolled into the PTO pulley. NOTE: Before using the tractor doublecheck the belt routing to make sure that the belt has been routed properly. Replacing the Belt 1. Remove the deck from beneath the tractor. Refer to Deck Removal. 2. Remove the wing knobs securing the belt covers to the deck. See Figure 4-6. 3. Remove the two idler pulleys (a) by removing the flange lock nuts (b) and pulley caps (c) that secure them to the deck and the idler arm. See Figure 4-7. Do not lose any of the hardware when removing the flange lock nuts (b). (b) (c) (a) (b) (c) (a) Figure 4-7 NOTE: Take note of the position of the belt guards to ensure they are properly re-installed. 4. Remove the belt from the spindle pulleys. 5. Install the new belt around the spindle pulleys as shown and reinstall the belt covers. See Figure 4-8. Figure 4-8 6. Place the belt around the idler pulleys removed in step 3 with the "V" side facing in. Once in place, reinstall all the hardware and tighten the flange lock nut to secure the assembly. See Figure 4-6. 7. Route the belt as shown in Figure 4-6 and then reinstall the deck. Refer to "Deck Installation" on page 22. (a) (b) (a) Figure 4-6 Mower Blade Care WARNING! Before performing any maintenance, place the PTO switch in the "OFF" position, engage the parking brake lever, turn the ignition key to the "OFF" position and remove the key from the switch. Protect your hands by using heavy gloves when handling the blades. When servicing the mower deck, be careful not to cut yourself on the sharpened blades. The cutting blades must be kept sharp at all times. Sharpen the cutting edges of the blades evenly so that the blades remain balanced and the same angle of sharpness is maintained. If the cutting edge of a blade has already been sharpened many times, or if any metal separation is present, it is recommended that new blades be installed. New blades are available at your authorized dealer. The blades may be removed as follows. 1. Remove the deck from beneath the tractor, (refer to "Deck Removal" on page 22) then gently flip the deck over to expose its underside. 2. Use a 1-1/8" wrench to hold the hex nut on top of the spindle assembly when loosening the bolt securing the blade. A block of wood may be placed between the deck housing and the cutting edge of the blade to help in breaking loose the hex nut securing the blade. See Figure 4-9. Figure 4-9 3. When reinstalling the blades, be sure they are installed so that the wings are pointing upward toward the top of the deck. 4. Tighten the blade nuts to 70-90 ft. lbs. 5. Reinstall the deck. Refer to "Deck Installation" on page 22. Changing the Transmission Drive Belt Several components must be removed and special tools used in order to change the tractor's transmission drive belt. See your Cub Cadet dealer to have the transmission drive belt replaced. Tractor Creeping Creeping is the slight forward or backward movement of the mower when the throttle is on and the speed control pedals are in the neutral position. If your mower creeps, see an authorized service dealer. Section 4 - Service 23
-
 1
1 -
2
-
3
-
4
-
5
-
6
-
7
-
8
-
9
-
10
-
11
-
12
-
13
-
14
-
15
-
16
-
17
-
 18
18 -
 19
19 -
 20
20 -
 21
21 -
 22
22 -
 23
23 -
 24
24 -
 25
25 -
 26
26 -
 27
27 -
 28
28
 |
 |