Cub Cadet Z-Force S Commercial 60 Z-Force S Commercial 48 Operator's Manual - Page 29
Sharpening the Blades, Changing the Spindle Assembly, Changing the Transmission Drive Belt
 |
View all Cub Cadet Z-Force S Commercial 60 manuals
Add to My Manuals
Save this manual to your list of manuals |
Page 29 highlights
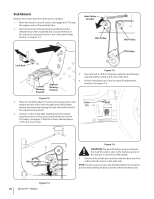
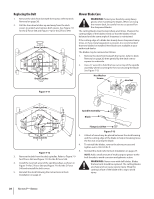
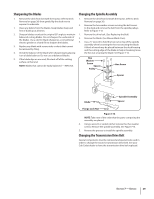
Sharpening the Blades 1. Remove the deck from beneath the tractor, (refer to Deck Removal on page 26) then gently flip the deck over to expose its underside. 1. Clean any debris from the blades. Keep blades sharp and free of build up at all times. 2. Sharpen blades evenly at the original 30° angle to maintain balanced cutting blades. Do not sharpen the underside of the blades. Use a electric blade sharpener, a conventional electric grinder or a hand file to sharpen the blades. 3. Replace any blade with severe nicks or dents that cannot be removed by filing. 4. Check the balance of the blade after sharpening by placing it on a blade balancer. Do not use unbalanced blades. 5. If the blade dips on one end, file stock off of the cutting surface on that end. NOTE: Blades that cannot be easily balanced - REPLACE. Changing the Spindle Assembly 1. Remove the deck from beneath the tractor, (refer to Deck Removal on page 26). 2. Remove the hex washer screws securing the belt covers to the deck and remove the belt from the spindle pulleys. Refer to Figure 7-13. 1. Remove the drive belt. (See Replacing the Belt) 2. Remove the blade. (See Mower Blade Care). 3. Use a 3⁄4" wrench to hold the hex nut on top of the spindle assembly when loosening the hex nut securing the blade. A block of wood may be placed between the deck housing and the cutting edge of the blade to help in breaking loose the hex nut securing the blade. See Figure 7-14. Hex Washer Screw Spacer Pulley Hex Screw Spacer Blade Spindle Assembly Spacer Flange Lock Nut Figure 7-14 NOTE: Take note of the order that the parts composing the assembly are placed. 4. Using a wrench or socket ratchet remove four hex washer screws. Remove the spindle assembly. See Figure 7-14. 5. Reverse the process to install the spindle assembly. Changing the Transmission Drive Belt Several components must be removed and special tools used in order to change the tractor's transmission drive belt. See your Cub Cadet dealer to have the transmission drive belt replaced. Section 7 - Service 29
-
 1
1 -
2
-
3
-
4
-
5
-
6
-
7
-
8
-
9
-
10
-
11
-
12
-
13
-
14
-
15
-
16
-
17
-
18
-
19
-
20
-
21
-
22
-
23
-
 24
24 -
 25
25 -
 26
26 -
 27
27 -
 28
28 -
 29
29 -
 30
30 -
 31
31 -
 32
32 -
 33
33 -
 34
34 -
35
-
36
 |
 |
