Cuisinart SS-10P1 User Manual - Page 10
Your Brew Size
 |
View all Cuisinart SS-10P1 manuals
Add to My Manuals
Save this manual to your list of manuals |
Page 10 highlights
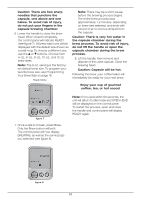
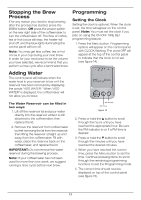
Caution: There are two sharp needles that puncture the capsule, one above and one below. To avoid risk of injury, do not put your fingers in the capsule brewing chamber. 6. Lower the handle to close the brew head. When closed completely, the control panel will indicate READY (see figure 7). All brew-size icons will be displayed with the default size shown as a solid mug. To choose a different size, use the or buttons. Choose from 4-oz., 6-oz., 8-oz., 10-oz., and 12-oz. brew sizes. Note: The 8-oz. serving is the factoryset default brew size. To program your favorite brew size, see Programming Your Brew Size on page 16. Ready Mode Note: There may be a short pause before the brewing process begins. The entire brew process lasts approximately 1-2 minutes, depending on brew size selected, and ends with a burst of air to remove all liquid from the capsule. Caution: There is very hot water in the capsule chamber during the brew process. To avoid risk of injury, do not lift the handle or open the capsule chamber during the brew process. 8. Lift the handle, then remove and dispose of the used capsule. Close the brewing head. Caution: Capsule will be hot. Following the brew, your coffeemaker will immediately be ready for your next brew. Enjoy your cup of gourmet coffee, tea, or hot cocoa! figure 7 7. Once a size is chosen, press Brew. Only the Brew button will be lit. The control panel will now display BREWING, as well as the serving size you selected (see figure 8). Note: If not used within 60 seconds, the unit will return to Idle mode and OPEN HEAD will be displayed on the control panel. To restart the process, open and close the handle and control panel will display READY again. figure 8 10
-
 1
1 -
2
-
3
-
4
-
 5
5 -
 6
6 -
 7
7 -
 8
8 -
 9
9 -
 10
10 -
 11
11 -
 12
12 -
 13
13 -
 14
14 -
 15
15 -
16
-
17
-
18
-
19
-
20
-
21
-
22
-
23
-
24
-
25
-
26
-
27
-
28
-
29
-
30
-
31
-
32
-
33
-
34
-
35
-
36
-
37
-
38
-
39
-
40
-
41
-
42
-
43
-
44
 |
 |
