D-Link DCS-934L User Manual - Page 21
WPS - Push Button Setup
 |
View all D-Link DCS-934L manuals
Add to My Manuals
Save this manual to your list of manuals |
Page 21 highlights
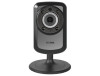
Section 2 - Installation WPS - Push Button Setup If your router supports Wi-Fi Protected Setup (WPS), the easiest way to create a secure wireless connection is by using the WPS Button on the back of the camera. In general, WPS setup only establishes the connection, so you still need to run the Setup Wizard to configure your camera. The exception is Zero Configuration setup with a D-Link Cloud Router. You can use WPS to connect the DCS-934L to your router, and then register your camera with mydlink. Refer to "Add Your Camera to Your mydlink Account" on page 16. Create a WPS Connection Step 1 With the camera powered on, press and hold the WPS button for about three seconds. The blue WPS status LED above the button will blink. Step 2 Press the WPS button on your router within 60 seconds. The WPS button is probably on the back of your router. If you are not sure where the WPS button is located on your router, refer to your router's User Manual. On some routers, you may need to log in to the web interface and click on an on-screen button to activate the WPS feature. Step 3 Allow up to one minute to configure. The DCS-934L will automatically create a wireless connection to your router. While connecting, the green LED will flash and your camera will reboot. WPS Button D-Link DCS-934L User Manual 21
-
 1
1 -
2
-
3
-
4
-
5
-
6
-
7
-
8
-
9
-
10
-
11
-
12
-
13
-
14
-
15
-
 16
16 -
 17
17 -
 18
18 -
 19
19 -
 20
20 -
 21
21 -
 22
22 -
 23
23 -
 24
24 -
 25
25 -
 26
26 -
27
-
28
-
29
-
30
-
31
-
32
-
33
-
34
-
35
-
36
-
37
-
38
-
39
-
40
-
41
-
42
-
43
-
44
-
45
-
46
-
47
-
48
-
49
-
50
-
51
-
52
-
53
-
54
-
55
-
56
-
57
-
58
-
59
-
60
-
61
-
62
-
63
-
64
-
65
-
66
-
67
-
68
-
69
-
70
-
71
-
72
 |
 |
