D-Link DES-3552 Product Manual - Page 175
Access Profile List, Action, Option, Apply To, Apply, ACL > Access Profile List
 |
UPC - 790069321917
View all D-Link DES-3552 manuals
Add to My Manuals
Save this manual to your list of manuals |
Page 175 highlights
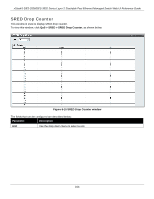
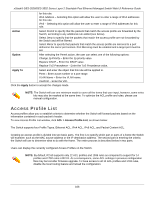
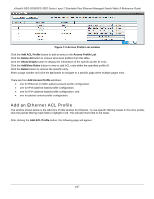
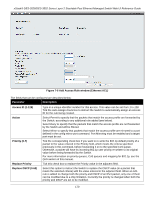
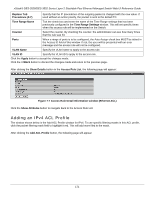
xStack® DES-3528/DES-3552 Series Layer 2 Stackable Fast Ethernet Managed Switch Web UI Reference Guide for this rule. IPv4 Address - Selecting this option will allow the user to enter a range of IPv4 addresses for this rule. IPv6 - Selecting this option will allow the user to enter a range of IPv6 addresses for this rule. Action Option Select Permit to specify that the packets that match the access profile are forwarded by the Switch, according to any additional rule added (see below). Select Deny to specify that the packets that match the access profile are not forwarded by the Switch and will be filtered. Select Mirror to specify that packets that match the access profile are mirrored to a port defined in the mirror port section. Port Mirroring must be enabled and a target port must be set. After selecting the Permit action, the user can select one of the following options: Change 1p Priority - Enter the 1p priority value. Replace DSCP - Enter the DSCP value. Replace ToS Precedence - Enter the ToS Precedence value. Apply To Select and enter the object that this rule will be applied to. Ports - Enter a port number or a port range. VLAN Name - Enter the VLAN name. VLAN ID - Enter the VID. Click the Apply button to accept the changes made. NOTE: The Switch will use one minimum mask to cover all the terms that user input, however, some extra bits may also be masked at the same time. To optimize the ACL profile and rules, please use manual configuration. Access Profile List Access profiles allow you to establish criteria to determine whether the Switch will forward packets based on the information contained in each packet's header. To view Access Profile List window, click ACL > Access Profile List, as shown below: The Switch supports four Profile Types, Ethernet ACL, IPv4 ACL, IPv6 ACL, and Packet Content ACL. Creating an access profile is divided into two basic parts. The first is to specify which part or parts of a frame the Switch will examine, such as the MAC source address or the IP destination address. The second part is entering the criteria the Switch will use to determine what to do with the frame. The entire process is described below in two parts. Users can display the currently configured Access Profiles on the Switch. NOTE: By default, R2.60 supports only 12 ACL profiles and 1536 rules as compared to support for 14 profiles and 1792 rules in R2.01. As a consequence, some ACL settings in previous configuration files may be lost after firmware upgrade. To have access to all 14 ACL profiles and 1792 rules, disable the local routing feature and reload the configuration. 166
-
 1
1 -
2
-
3
-
4
-
5
-
6
-
7
-
8
-
9
-
10
-
11
-
12
-
13
-
14
-
15
-
16
-
17
-
18
-
19
-
20
-
21
-
22
-
23
-
24
-
25
-
26
-
27
-
28
-
29
-
30
-
31
-
32
-
33
-
34
-
35
-
36
-
37
-
38
-
39
-
40
-
41
-
42
-
43
-
44
-
45
-
46
-
47
-
48
-
49
-
50
-
51
-
52
-
53
-
54
-
55
-
56
-
57
-
58
-
59
-
60
-
61
-
62
-
63
-
64
-
65
-
66
-
67
-
68
-
69
-
70
-
71
-
72
-
73
-
74
-
75
-
76
-
77
-
78
-
79
-
80
-
81
-
82
-
83
-
84
-
85
-
86
-
87
-
88
-
89
-
90
-
91
-
92
-
93
-
94
-
95
-
96
-
97
-
98
-
99
-
100
-
101
-
102
-
103
-
104
-
105
-
106
-
107
-
108
-
109
-
110
-
111
-
112
-
113
-
114
-
115
-
116
-
117
-
118
-
119
-
120
-
121
-
122
-
123
-
124
-
125
-
126
-
127
-
128
-
129
-
130
-
131
-
132
-
133
-
134
-
135
-
136
-
137
-
138
-
139
-
140
-
141
-
142
-
143
-
144
-
145
-
146
-
147
-
148
-
149
-
150
-
151
-
152
-
153
-
154
-
155
-
156
-
157
-
158
-
159
-
160
-
161
-
162
-
163
-
164
-
165
-
166
-
167
-
168
-
169
-
 170
170 -
 171
171 -
 172
172 -
 173
173 -
 174
174 -
 175
175 -
 176
176 -
 177
177 -
 178
178 -
 179
179 -
 180
180 -
181
-
182
-
183
-
184
-
185
-
186
-
187
-
188
-
189
-
190
-
191
-
192
-
193
-
194
-
195
-
196
-
197
-
198
-
199
-
200
-
201
-
202
-
203
-
204
-
205
-
206
-
207
-
208
-
209
-
210
-
211
-
212
-
213
-
214
-
215
-
216
-
217
-
218
-
219
-
220
-
221
-
222
-
223
-
224
-
225
-
226
-
227
-
228
-
229
-
230
-
231
-
232
-
233
-
234
-
235
-
236
-
237
-
238
-
239
-
240
-
241
-
242
-
243
-
244
-
245
-
246
-
247
-
248
-
249
-
250
-
251
-
252
-
253
-
254
-
255
-
256
-
257
-
258
-
259
-
260
-
261
-
262
-
263
-
264
-
265
-
266
-
267
-
268
-
269
-
270
-
271
-
272
-
273
-
274
-
275
-
276
-
277
-
278
-
279
-
280
-
281
-
282
-
283
-
284
-
285
-
286
-
287
-
288
-
289
-
290
-
291
-
292
-
293
-
294
-
295
-
296
-
297
-
298
-
299
-
300
-
301
-
302
-
303
-
304
-
305
-
306
-
307
-
308
-
309
-
310
-
311
-
312
-
313
-
314
-
315
-
316
-
317
-
318
-
319
-
320
-
321
-
322
-
323
-
324
-
325
-
326
-
327
-
328
-
329
-
330
-
331
-
332
-
333
-
334
-
335
-
336
-
337
-
338
-
339
-
340
-
341
-
342
-
343
-
344
-
345
-
346
-
347
-
348
-
349
-
350
-
351
-
352
-
353
-
354
-
355
-
356
-
357
-
358
-
359
-
360
-
361
-
362
-
363
-
364
-
365
-
366
-
367
 |
 |
