D-Link DHN-120 Product Manual - Page 5
Installing Adapters and Cables, Installing USB Adapters, Installing Cables
 |
View all D-Link DHN-120 manuals
Add to My Manuals
Save this manual to your list of manuals |
Page 5 highlights
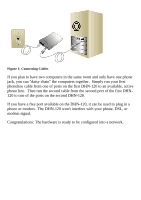
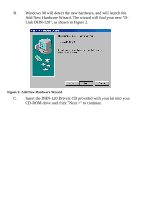
Chapter 2 Installing Adapters and Cables If you plan to set up two computers in the same room, you can use a single phone jack. Keep in mind that at all times at least one of the cards on your phoneline network must be plugged into a phone jack. Also keep in mind that the phone jack must be for an active phone line. The phoneline network cards depend on the small voltage that it is on your phone lines to function properly. Installing USB Adapters USB is the simplest way to install a network adapter. It is a simple matter of using the included USB cable to connect the DHN-120 to an open USB port on any PC or laptop you wish to connect. Please make sure that each computer is off before plugging the unit in. Once you have created your network, you will be able to hot-plug the DHN-120 at will, but for the purposes of this manual it is best if you initially install the adapters with your computers powered off. Installing Cables The cable included in the box is 15 feet in length. If you need a longer cable, they are sold at most electronics stores. If you want to use a phone on the same phone jack, we recommend that you purchase a splitter for the jack. If you plan to use 2 or more phone jacks, make sure that they are (1) active and (2) on the same line (the same phone number). The Home Phoneline adapters will NOT interfere with your normal phone, analog modem, or DSL modem but they do require an active phone line to work. With the power off on your computers, run the first cable from your DHN120 USB HPNA 2.0 Network Adapter directly to the phone jack. If you have two available phone jacks on the same line (telephone number) then simply repeat this step for any other machines you would like to add to your home phoneline network like the picture below, Figure 1: 3
-
 1
1 -
 2
2 -
 3
3 -
 4
4 -
 5
5 -
 6
6 -
 7
7 -
 8
8 -
 9
9 -
 10
10 -
 11
11 -
12
-
13
-
14
-
15
-
16
-
17
-
18
-
19
-
20
-
21
-
22
-
23
-
24
-
25
-
26
-
27
-
28
-
29
-
30
-
31
-
32
-
33
-
34
-
35
-
36
-
37
-
38
-
39
-
40
-
41
-
42
-
43
-
44
-
45
-
46
-
47
-
48
-
49
 |
 |