Dacor DYWS4 Use & Care Manuals - Page 10
Operating Your Wine Dispensing System, Setting Up Your Wine Dispensing System
 |
View all Dacor DYWS4 manuals
Add to My Manuals
Save this manual to your list of manuals |
Page 10 highlights
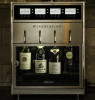
Setting Up Your Wine Dispensing System Preparing to Use Your Wine Dispenser for the First Time (cont.) 9. Find the gas regulator assembly that comes with the unit. WARNING To avoid personal injury, use only the included gas pressure regulator or a Dacor specified replacement. 11. Make sure the regulator adjustment knob is turned all the way in the OFF direction. 12. Connect the gas supply line from the wine dispensing system to the gas connector on the regulator assembly. 13. Remove the plastic cap from the top of the argon gas cylinder (must be ordered separately, see page 23). 14. Insert the top of the gas cylinder into the bottom of the gas regulator assembly and turn it clockwise, by hand, until it is snug. Do not use a wrench or overtighten. 15. Turn the regulator knob in the ON direction until it stops. 16. Plug the power cord into the grounded 120 Vac., 60 Hz. electrical outlet. Regulator adjustment knob Regulator assembly Gas supply line from wine dispensing system Argon gas cylinder Operating Your Wine Dispensing System Turning the System ON/OFF 1. Open the door on the front of the unit. Swing the spout cover to the up position. 2. To turn the unit on, slide the power switch all the way up to the ON position. When powering on, the unit will run through a series of diagnostics, which will take several seconds. NOTE: If the control panel is LOCKED see page 15 to unlock. The control panel may lock when the system is turned OFF or after a power failure. The lock may also be turned on intentionally from the control panel. See page 15. 3. To turn the unit off, slide the power switch all the way down to the OFF position. 4. Lower the spout cover by pushing up and holding the lever on the bottom as you lower it down. CAUTION: Do not push down on the spout cover without pushing up on the lever. Damage to the lever will result. 5. Once the spout cover is closed, close the bottle bay door. Push in slightly just above the lock until it snaps shut. 8 ON OFF Spout cover release lever (on bottom of spout cover)
-
 1
1 -
2
-
3
-
4
-
 5
5 -
 6
6 -
 7
7 -
 8
8 -
 9
9 -
 10
10 -
 11
11 -
 12
12 -
 13
13 -
 14
14 -
 15
15 -
16
-
17
-
18
-
19
-
20
-
21
-
22
-
23
-
24
-
25
-
26
-
27
-
28
-
29
-
30
-
31
-
32
 |
 |
