Dacor DYWS4 Use & Care Manuals - Page 6
System
 |
View all Dacor DYWS4 manuals
Add to My Manuals
Save this manual to your list of manuals |
Page 6 highlights
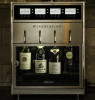
Getting to Know Your Wine Dispensing System System A Main Power Switch (under spout cover) Switch Positions ON SERVICE MODE B RESERVED OFF F For use by authorized service g personnel only C D E A Main power switch B Control panel C Bottle bay D Bottle bay door E Drip tray F Spout cover G Spouts Use the switch to turn the system ON and OFF and to access the main service menu (see page 11). The control panel has a display and set of pour control buttons for each wine bottle. The control panel is also used to change the settings on the unit, such as amount of wine poured with each button push and the temperature settings. The bottle bay can hold up to four bottles of wine at a time, ready for pouring at the touch of a button. The locking bottle bay door is see-through to allow you to read the bottle labels with the door closed. When the key is removed, the lock on the door prevents access to the wine bottles in two ways. First, it prevents direct access to the wine bottles by keeping the door from opening. Second, when the control panel is locked (see page 15), the lock on the door prevents access to the main power switch which is required to unlock the control panel and dispense wine. Inside the bottle bay. The drip tray is removable and washable. Open the door and lift up the spout cover to insert the wine bottles (with dispensing heads attached) into the system and to access the power switch. Attached to the removable Clean-Pour®* dispensing heads (see page 6) that are inserted into the bottle bay, the spouts allow quick and clean dispensing of your favorite wines. * Clean-Pour is a registered trademark of Napa Technology 4
-
 1
1 -
 2
2 -
 3
3 -
 4
4 -
 5
5 -
 6
6 -
 7
7 -
 8
8 -
 9
9 -
 10
10 -
 11
11 -
 12
12 -
13
-
14
-
15
-
16
-
17
-
18
-
19
-
20
-
21
-
22
-
23
-
24
-
25
-
26
-
27
-
28
-
29
-
30
-
31
-
32
 |
 |
