Dacor DYWS4 Use & Care Manuals - Page 11
Operating Your Wine Dispensing System - 20
 |
View all Dacor DYWS4 manuals
Add to My Manuals
Save this manual to your list of manuals |
Page 11 highlights
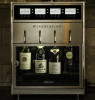
Operating Your Wine Dispensing System Attaching the Clean-Pour Dispensing Heads 6. The gasket must be fully un-tightened (collar all the way up, touching the main body) before you insert the head. Turn the collar as shown until it stops. Caution To avoid dropping a wine bottle when carrying it around with the dispensing head attached, always hold the bottle itself (not just the head). 1. Open the bottle and place it on a flat, dry surface. 2. Insert the head selection tool into the bottleneck to determine the correct (color coded) gasket size. NOTE: The red gasket should work with most wines bottled in North America. If you need to change the gasket, see page 20 for instructions. Green Red White If you do not have a head selection tool, try inserting different heads into the bottle, from wide to narrow (green, red, white), until you find the correct size that fits. 3. Take a clean dispensing head of the size you have selected. Check that the gasket is in good condition and the cap is properly installed on top. (See the Cleaning and Care section for more details). 4. Insert a clean pick up tube into the bottle. (It is normal for the upper end of the tube to extend beyond the tip of the bottle at this point). 5. Insert the pick up tube firmly into the opening on the bottom of the head, as shown. (Keep the rest of the tube inside the bottle while doing this). NOTE: If the pick-up tube is not properly attached, the system will not be able to draw wine out of the bottle and it will assume the bottle is empty. Un-tighten collar completely Tighten gasket nut 7. Turn the gasket nut with your fingers as shown to make sure the gasket is secure. 8. Carefully insert the dispensing head (with the pick up tube still attached) into the bottle. The head should go in easily with one arm extended forward. Do not lean on the head or force it in, as this may damage the gasket and/or the bottleneck. If the head gasket will not insert, check to make sure the collar is fully un-tightened and the correct gasket size is being used. The head should rest firmly on top. Do not let the tube push the head out of the bottle. (instead, the tube should coil slightly inside at the bottom). Insert pick-up tube 9. Turn the head to align the spout with the bottle label. 10. While pressing down on the head with one hand, tighten the collar as shown with your other hand. Use only two fingers and your thumb to turn (there is no need to use the entire force of your hand). As you turn, the gasket will expand inside the bottleneck, sealing and holding the bottle from the inside. Do not over-tighten. continued... 9
-
 1
1 -
2
-
3
-
4
-
5
-
 6
6 -
 7
7 -
 8
8 -
 9
9 -
 10
10 -
 11
11 -
 12
12 -
 13
13 -
 14
14 -
 15
15 -
 16
16 -
17
-
18
-
19
-
20
-
21
-
22
-
23
-
24
-
25
-
26
-
27
-
28
-
29
-
30
-
31
-
32
 |
 |
