Dacor EO127 Use & Care Manuals - Page 12
Operating Your Oven - The Basics
 |
View all Dacor EO127 manuals
Add to My Manuals
Save this manual to your list of manuals |
Page 12 highlights
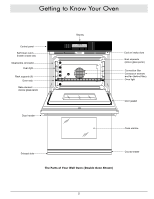
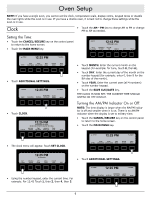
Operating Your Oven - The Basics Before You Cook • When the oven is not in use and none of the keys on the control panel have been touched for about five minutes, the display will go to "sleep." When the display is sleeping, it is not lit. To wake the display (make it reappear), touch one of the keys on the control panel or open the oven door. • When you use your oven to bake or roast, it preheats automatically. The preheat cycle rapidly brings the oven chamber up to the proper cooking temperature. It usually takes 7 to 14 minutes to preheat the oven, depending on the temperature settings. Pre-heat times may be longer depending on the type of electrical supply in your community. There is no preheat cycle for any of the broil modes. • After you pull food out of the oven, it will continue to cook. This is called carry-over. The larger the portion of food, the longer it will carry-over. It is best to let the meat rest after it comes out of the oven for 10 to 15 minutes before carving. Doing so will allow the meat to retain its juices and make it easier to carve. Standard Racks warning Rearrange the oven racks only when the oven is cool. How to Insert Standard Oven Racks • Insert the end of the rack with the safety notches into the oven first. • Attach both sides of the rack to the rack supports in the oven as shown in the diagram below. • Begin to slide the rack in, and then, lift up so that the safety notches clear the ends of the rack supports. Back of rack Rack support Front of rack Safety notch Slide the oven rack supports into the slots on the rack Inserting a Standard Oven Rack • Push the rack all the way in with both hands. How to Remove Standard Oven Racks • If you want to remove an oven rack, grasp it with both hands and pull gently straight out toward you until it stops. • To remove the rack completely, lift the front of the rack up about six inches and continue to pull out. Lifting the rack releases the safety notches. The safety notches prevent the rack from coming out of the oven accidentally. Glide Rack™ Oven Racks Your oven comes with a Dacor GlideRack oven rack. You can pull this type of rack out further than the standard racks and still support heavy pots and pans full of food. It is great for heavier foods and the baking stone. warning Rearrange the oven racks only when the oven is cool. How to Insert Your GlideRack Oven Rack • Hold the rack with the guides fully extended away from you (see diagram below). • Align both sets of safety clips (right and left) on the back of the guides with the oven rack supports as shown in the diagram below. • Begin to slide the rack in, lifting the front safety clips over the front of the oven rack supports. Guides Back of guides Oven rack support Front of rack Lift front safety clips Slide rack supports over rack supports between back safety clips Inserting a GlideRack™ Oven Rack • Push the rack all the way to the back. • Grasp the rack in the center of the front and pull. The rack should come forward while the guides remain in place. How to Remove Your GlideRack Oven Rack • If you want to remove rack, grasp it with both hands and pull gently straight out toward you until it stops. • To remove the rack completely, lift the front up about six inches and continue to pull out. Lifting the rack releases the safety clips. The safety clips prevent it from coming out of the oven accidentally. 10
-
 1
1 -
2
-
3
-
4
-
5
-
6
-
 7
7 -
 8
8 -
 9
9 -
 10
10 -
 11
11 -
 12
12 -
 13
13 -
 14
14 -
 15
15 -
 16
16 -
 17
17 -
18
-
19
-
20
-
21
-
22
-
23
-
24
-
25
-
26
-
27
-
28
-
29
-
30
-
31
-
32
-
33
-
34
-
35
-
36
-
37
-
38
-
39
-
40
 |
 |
