Dacor ERD36SCH Use and Care Manual - Page 15
Clock Display, Cause - f6 code
 |
View all Dacor ERD36SCH manuals
Add to My Manuals
Save this manual to your list of manuals |
Page 15 highlights
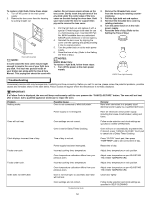
Oven is set for Delay Timed Cleaning Oven will turn on automatically at preset time. If desired, press "CANCEL•SECURE" touch pad to cancel out of Delay Timed Cleaning Oven will not work. Light bulb is burned out. Follow REPLACING THE OVEN LIGHT. Door will not open. Oven is in Self-Clean mode. If oven is hot, door latch will release automatically when oven temperature falls below 390˚F at end of cycle. If Self-Clean was just selected and the oven is still cool, press "CANCEL•SECURE" to turn off Self-Clean. The door will open in about 30 seconds. Oven will not heat after Self-Clean. Time of day is not set dure to power failure. Press "CLOCK" touch pad, then press "TIME•TEMP" pad to set correct time of day. Oven settings are not correct. Follow mode selection and clock settings as specified in OVEN OPERATION. Oven is set for Delayed Time mode. Oven will turn on automatically at present time. If desired, press "CANCEL•SECURE" button to cancel out of Delay Timed mode. Ignitors do not spark. Circuit breaker is tripped. Reset circuit breaker. House fuse is blown. Replace house fuse. Power outage in local area. Contact power company. Sparking but no flame ignition. Gas shut-off valve is in "off" position. Turn shut-off valve to "on" position. Gas supply is interrupted. Contact gas company. Burners ignite but flame is extremely large, distorted or yellow. Burner ring ports are clogged. Clean burner ring ports with straightened paper clip, needle or wire. Burner ports or burner caps are not positioned properly. Remove and carefully re-install burner rings and caps. Cooktop is being operated on the wrong type of gas. Ensure that the type of cooktop matches the gas supply (natural gas or L.P. gas). Regulator is not installed, is faulty or is set for the wrong type of gas. Check installation, replace regulator, or set regulator for proper gas. Burner flame goes out at low setting. Low gas supply pressure. Contact gas company. Air intake holes around knobs are obstructed. Remove obstruction. Ignitors spark continuously after flame ignition. Power supply is not grounded. Have power supply properly grounded. Power supply polarity is reversed. Have polarity corrected. Ignitors are wet or dirty. Troubleshooting Guide (Continued) Dry or clean ignitors. Clock Display F0 F1 F2 F3 F4 F6 F7 F8 Cause Touch pad is stuck in a depressed position. Relay circuit failure. Oven temperature exceeded the clean runaway temperature (Self-Clean mode only) or the cooking runaway temperature (cooking modes only). Short circuit in the oven temperature sensor. Open circuit in the oven temperature sensor. Failure in the EEPROM check comparison. (Only time of day and timer will operate.) Failure of the Self-Clean automatic door latch circuit. Failure of the door latch motor. Oven Failure Codes 13
-
 1
1 -
2
-
3
-
4
-
5
-
6
-
7
-
8
-
9
-
 10
10 -
 11
11 -
 12
12 -
 13
13 -
 14
14 -
 15
15 -
 16
16 -
 17
17 -
 18
18 -
 19
19 -
 20
20
 |
 |
