Dacor ERD36SCH Use and Care Manual - Page 7
Securing Controls, Baking, Roasting - searing grill
 |
View all Dacor ERD36SCH manuals
Add to My Manuals
Save this manual to your list of manuals |
Page 7 highlights
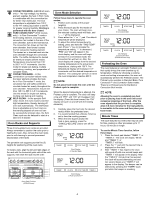
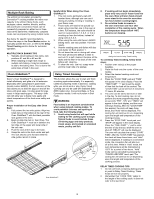
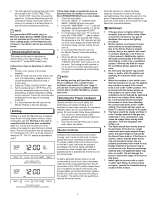
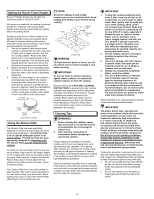
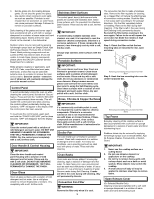
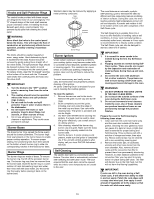
IMPORTANT: Cancellation of the Minute Timer does not turn off the oven if it is operating. You must manually shut the oven off by pressing the "CANCEL•SECURE" touch pad. (See the Delay Timed Cooking section on page 7 for automatic oven turn on and turn off.) NOTES: 1. To view the current time of day rather than the remaining time on the Minute Timer, just press the "CLOCK" touch pad. To change back to a Minute Timer display, press the "TIMER 1" or "TIMER 2" touch pad. 2. To cancel the Minute Timer while in progress, press the "TIMER 1 or 2" touch pad two times. The clock display will return to the time of day. 3. The Minute Timers may be used at the same time as Delay Timed Cooking or Self-Clean. 4. The Minute Timers will beep for 2 minutes (if not cancelled) before automatically shutting off. 5. Pressing the "CANCEL•SECURE" pad when the beeper is sounding will cancel both the beeper and the cooking function. Securing Controls To avoid accidentally turning the oven on, activate the "SECURE" feature. Press and hold the "CANCEL•SECURE" pad for approximately three seconds. This will disable the control panel and allow cleaning the controls without accidentally starting any functions. Three beeps will sound and "OFF" will appear in the display when the control panel has been secured. To re-activate the control panel, again push and hold the "CANCEL•SECURE" pad for three seconds. Three beeps will sound and the "OFF" will disappear from the display. Baking Your DACOR range offers two convection baking modes: Pure Convection™ or Convection Bake. As a general rule, a convection mode will allow preparation of most foods at reduced temperatures for shorter periods of time, while also producing superior results. Typically you can reduce standard temperature by 25˚F and cook for 10% less time. Baked goods will have golden-brown crusts with flaky textures, and meats will have crispy exteriors with succulent juices sealed inside. 1. To convert Conventional Bake recipes to our convection recipes, reduce temperature by 25˚F and the cooking time by approximately 10%. 2. Some recipes, especially those that are homemade, may require adjustment and testing when converting from standard to convection modes. If unsure how to convert a recipe, begin by preparing the recipe in Bake mode. After achieving acceptable results this way, follow the Convection guidelines listed. If the food is not prepared to your satisfaction during this first Convection trial, adjust only one recipe variable at a time (such as cooking time, rack position or temperature) and repeat the convection test. If necessary, continue adjusting one recipe variable at a time until satisfactory results are achieved. 3. Do not open the oven door frequently during baking. Look through the door window to check the progress of baking whenever possible. 4. Use the Minute Timers to time baking functions. 5. Wait until the shortest recommended baking time before checking food. For baked goods, a wooden pick placed in the center should come clean when the food is done. 6. Measure ingredients carefully and follow tested recipes for best baking results. 7. Bakeware Tips: • Use the pan size and type recommended by the recipe to ensure best results. • Cakes, quick breads, muffins and cookies should be baked in shiny, reflective pans for light, golden crusts. • Medium gauge aluminum sheets with low sides should be used when preparing cookies, biscuits and cream puffs. • Bake most frozen foods in their original foil containers placed on a flat cookie sheet. Follow the package recommendations. • When using glass bakeware, reduce the recipe temperature by 25˚F, except when baking pies or yeast breads. Follow the standard recipe baking time for pies and yeast breads. • Avoid the use of old, darkened pans. • Warped, dented, stainless steel and tin-coated pans heat unevenly and will not give uniform baking results. 8. Tips for Pan Placement: • Place pans carefully on the oven racks. Turn pans on the racks so that the long sides run left to right, parallel to the door. 9. Adjustments to recipe times and temperatures will have to be made when baking at high altitudes. Consult a cookbook on high-altitude cooking or contact the Home Economics Departments at your state university for specific recommendations. NOTE: For common baking problems refer to your Dacor cookbook. Your complimentary cookbook was packed with your range. If you did not receive your cookbook, please contact Dacor at (800) 793-0093 or at www.dacor.com Roasting All baking modes can be used to successfully roast in your oven. However, the Convection mode is recommended to produce meats that are deliciously seared on the outside and succulently juicy on the inside in record time. Foods that are exceptional, when prepared in a Convection mode, include: beef, pork, ham, lamb, turkey, chicken, and cornish hens. 1. To convert conventional Bake recipes to Convection recipes, reduce the temperature by 25˚F and the cooking time by approximately 10%. 2. Using a roasting rack, always roast meats fat side up in a shallow pan. Always use a pan that fits the size of the food being prepared. The broiler pan and grill, accompanying the oven, can be used in most cases. No basting is required when the fat side is up. Do not add water to the pan. It will cause a steamed effect. Roasting is a dry heat process. 3. Poultry should be placed breast side up on a rack in a shallow pan that fits the size of the food. Again, the broiler pan and grill accompanying the oven can be used. Brush poultry with melted butter, margarine, or oil before and during roasting. 4. For Convection roasting, do not use pans with tall sides. They interfere with the circulation of heated air over the food. 5. When using a meat thermometer, insert the probe halfway into the center of the thickest portion of the meat. (For poultry, insert the thermometer probe between the body and leg into the thickest part of the inner thigh.) To ensure an accurate reading, the tip of the probe should not touch bone, fat or gristle. Check the meat temperature 2/3 of the way through the recommended roasting time. 6. After reading the meat thermometer once, insert it 1/2 inch further into the meat, then take a second reading. If the second temperature registers below the first, continue cooking the meat. 7. Remove meats from the oven when the thermometer registers 5˚ to 10˚F below the desired temperature. The meat will continue to cook after removal. 8. Allow roasts to stand 15 to 20 minutes after roasting in order to make carving easier. 9. If using a cooking bag, foil tent, or other cover, use Bake Mode (ERDE models only) or Convection Bake Mode (ERD models only). The recipe time and temperature will have to be adjusted as well. 10. Roasting times always vary according to the size, shape and quality of meats and poultry. Less tender cuts of meat are best prepared in Bake and may require moist cooking techniques. Follow your favorite cookbook recipes. 11. Reduce spatter by lining the bottom of the roasting pan with lightly crushed aluminum foil. 5
-
 1
1 -
 2
2 -
 3
3 -
 4
4 -
 5
5 -
 6
6 -
 7
7 -
 8
8 -
 9
9 -
 10
10 -
 11
11 -
 12
12 -
13
-
14
-
15
-
16
-
17
-
18
-
19
-
20
 |
 |
