Dacor ERD36SCH Use and Care Manual - Page 3

Purpose of This Manual, Product Registration, What to - warranty

Page 3 highlights

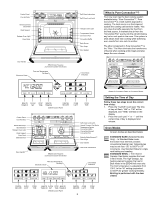
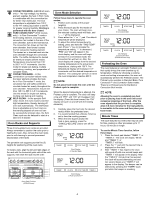
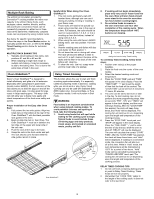
TABLE OF CONTENTS 1 Purpose of this Manual 1 Product Registration 1 IMPORTANT INSTRUCTIONS 2 What To Do 2 What Not To Do 2 OVEN OPERATION 3-7 Getting Started 3 What is Pure Convection 4 Setting the Time of Day 4 Oven Modes 4 Oven Racks & Supports 4 Oven Mode Selection 5 Preheating the Oven 5 Using the Minute Timers 5 Securing the Controls 6 Baking 6 Roasting 6 Multiple Rack Baking 6 Delay Timed Cooking 6-7 Dehydrating/Defrosting 7 Broiling 7 COOKTOP OPERATION 7-8 Selecting the Proper Cookware 7 Burner Controls 7 Setting the Burner Flame Height 8 Using the Simmer Plate 8 CARE AND CLEANING 8-12 Cleaning Tips 8-9 Control Panel 9 Door Handle & Control Housing 9 Door Glass 9 Stainless Steel Surfaces 9 Porcelain Surfaces 9 Brass and Chrome Surfaces 9 Broiler Pan 9 Oven Racks 9 Convection Fan Filter 9 Top Frame 9 Oven Exhaust Cover 9 Knobs and Spill Protector rings 10 Burner Bases 10 Burner Rings 10 Burner Ignitors 10 Self-Cleaning 10-11 Adjusting the Oven Temperature 11 Replacing the Oven Light 11-12 PROBLEM SOLVING 12-14 Troubleshooting 12-13 Product Maintenance 14 If You Need Service 14 PRODUCT WARRANTY 14 What Is Covered 14 What Is Not Covered 14 Product Registration Purpose of This Manual This Use & Care Manual is designed to enable you to properly operate and maintain your new range. Please keep this manual handy for easy access and quick reference. Additional information may be requested by e-mailing, writing or phoning the DACOR Customer Service Department. The address and phone number of this department are listed on the inside front cover of this manual. What to Do 1. Begin by ensuring proper installation and grounding of the appliance by a qualified technician according to the accompanying Installation Instructions. Have the installer show you where the fuse or junction box and gas valve are located so that you know how and where to turn off the utilities. If you smell gas, do not use the range. Immediately turn off the gas supply at the shut off valve, disconnect electrical power to the unit at the fuse or junction box, and contact the gas supplier or qualified appliance technician. 2. Ensure that the range is used only by those individuals who are able to operate it properly. 3. Use the range only for cooking tasks expected of a home oven as outlined in this manual. 4. Properly clean and maintain the range as recommended in this manual. 5. Use only dry potholders to avoid steam burns when removing hot cookware. 6. Exercise caution when opening the oven door. Let hot air or steam escape before looking or reaching into the oven. 7. Allow the oven cool air intake (located at the door handle) to remain unobstructed at all times. 8. Position oven racks in desired locations when the oven is cool. (If a rack must be repositioned after the oven is already hot, be certain that the potholder does not contact a hot heating element in the oven.) 9. Before Self-Cleaning the oven, remove the broiler grill and pan, oven racks, convection fan filter and any other utensils. 10. Clean only those parts listed in this manual. 11. In the event that a burner flame goes out and gas escapes, turn off the gas control and open a window or door. Wait at least 5 minutes before attempting to use the cooktop. 12. Select utensils of the proper size, material, and construction for the particular type of cooking being done. Select utensils that are large enough to contain the desired quantity of food without boil-overs or spillovers. Choose pans with easy to hold handles that will stay cool while cooking. Do not use utensils with loose handles. Avoid using pans that are too heavy to lift safely. Use cookware only for its intended purpose. Certain types of glass, ceramic, and earthenware utensils are suitable for use only in an oven and not in cooktop applications. 13. When cooking, set the burner controls so that the flame heats only the bottom of the utensil and does not lick at the sides of the utensil. 14. When deep fat frying, be certain that the pan is large enough to contain the desired volume of food without overflow caused by bubbling of the fat. Never leave a deep fat fryer unattended. Avoid deep fat frying of moist or frost-covered foods, as foods with high water content may cause spattering or spilling of the hot fat. Heat fat slowly, and stir together any combinations of oils and fats prior to applying heat. Utilize a deep fat frying thermometer to avoid heating the fat to temperatures above the flash point. 15. Always turn pan handles to the side or back of the range. Do not turn handles towards the room where they are easily hit. Handles should not extend over adjacent burners. 16. Always check the positions of the control knobs to make sure the cooktop is off when you are finished cooking. 17. Before performing any service, turn off the gas supply by closing the gas shut-off valve and turning off electrical power supply. 18. Always light each burner prior to placing a utensil on the burner grate. Also, turn the control knob to the "off" position before removing a utensil from the burner grate. 19. Always clean the cooktop cautiously. If using a damp sponge or cloth, wait until the cooktop has cooled sufficiently to prevent steam burns. Also, some cleaners can produce harmful or unpleasant fumes if applied to hot surfaces. 20. Keep any ventilation filters clean to avoid grease fires. If you received a damaged product, immediately contact your dealer or builder. Do not install or use a damaged appliance. Please enter the information requested in the spaces provided below. This information will be required in the unlikely event that a service call becomes necessary: Model No. Serial No. Date Purchased Date Installed Purchased From Address Phone 1

  • 1
  • 2
  • 3
  • 4
  • 5
  • 6
  • 7
  • 8
  • 9
  • 10
  • 11
  • 12
  • 13
  • 14
  • 15
  • 16
  • 17
  • 18
  • 19
  • 20

1
12.
Select utensils of the proper size, material,
and construction for the particular type of
cooking being done. Select utensils that
are large enough to contain the desired
quantity of food without boil-overs or spill-
overs. Choose pans with easy to hold
handles that will stay cool while cooking.
Do not use utensils with loose handles.
Avoid using pans that are too heavy to lift
safely. Use cookware only for its intended
purpose. Certain types of glass, ceramic,
and earthenware utensils are suitable for
use only in an oven and not in cooktop
applications.
13.
When cooking, set the burner controls so
that the flame heats only the bottom of the
utensil and does not lick at the sides of the
utensil.
14.
When deep fat frying, be certain that the
pan is large enough to contain the desired
volume of food without overflow caused by
bubbling of the fat. Never leave a deep fat
fryer unattended. Avoid deep fat frying of
moist or frost-covered foods, as foods with
high water content may cause spattering or
spilling of the hot fat. Heat fat slowly, and
stir together any combinations of oils and
fats prior to applying heat. Utilize a deep
fat frying thermometer to avoid heating the
fat to temperatures above the flash point.
15.
Always turn pan handles to the side or
back of the range. Do not turn handles
towards the room where they are easily hit.
Handles should not extend over adjacent
burners.
16.
Always check the positions of the control
knobs to make sure the cooktop is off when
you are finished cooking.
17.
Before performing any service, turn off the
gas supply by closing the gas shut-off valve
and turning off electrical power supply.
18.
Always light each burner prior to placing a
utensil on the burner grate. Also, turn the
control knob to the “off” position before
removing a utensil from the burner grate.
19.
Always clean the cooktop cautiously. If
using a damp sponge or cloth, wait until
the cooktop has cooled sufficiently to
prevent steam burns. Also, some cleaners
can produce harmful or unpleasant fumes if
applied to hot surfaces.
20.
Keep any ventilation filters clean to avoid
grease fires.
This
Use & Care Manual
is designed to enable
you to properly operate and maintain your new
range. Please keep this manual handy for easy
access and quick reference.
Additional information may be requested by
e-mailing, writing or phoning the DACOR
Customer Service Department. The address
and phone number of this department are listed
on the inside front cover of this manual.
Please enter the information requested in the spaces provided below. This information will be required in the unlikely event that a service call
becomes necessary:
Model No.
Serial No.
Date Purchased
Date Installed
Purchased From
Address
Phone
If you received a damaged product,
immediately contact your dealer or builder.
Do not install or use a damaged appliance.
TABLE OF CONTENTS
....................................
1
Purpose of this Manual
................................
1
Product Registration
....................................
1
IMPORTANT INSTRUCTIONS
.........................
2
What To Do
..................................................
2
What Not To Do
............................................
2
OVEN OPERATION
.......................................
3-7
Getting Started
.............................................
3
What is Pure Convection™?
........................
4
Setting the Time of Day
................................
4
Oven Modes
.................................................
4
Oven Racks & Supports
...............................
4
Oven Mode Selection
...................................
5
Preheating the Oven
....................................
5
Using the Minute Timers
..............................
5
Securing the Controls
...................................
6
Baking
..........................................................
6
Roasting
.......................................................
6
Multiple Rack Baking
...................................
6
Delay Timed Cooking
................................
6-7
Dehydrating/Defrosting
................................
7
Broiling
.........................................................
7
COOKTOP OPERATION
...............................
7-8
Selecting the Proper Cookware
...................
7
Burner Controls
............................................
7
Setting the Burner Flame Height
..................
8
Using the Simmer Plate
...............................
8
CARE AND CLEANING
...............................
8-12
Cleaning Tips
............................................
8-9
Control Panel
...............................................
9
Door Handle & Control Housing
...................
9
Door Glass
...................................................
9
Stainless Steel Surfaces
..............................
9
Porcelain Surfaces
.......................................
9
Brass and Chrome Surfaces
........................
9
Broiler Pan
...................................................
9
Oven Racks
.................................................
9
Convection Fan Filter
...................................
9
Top Frame
....................................................
9
Oven Exhaust Cover
....................................
9
Knobs and Spill Protector rings
..................
10
Burner Bases
.............................................
10
Burner Rings
..............................................
10
Burner Ignitors
...........................................
10
Self-Cleaning
........................................
10-11
Adjusting the Oven Temperature
.................
11
Replacing the Oven Light
......................
11-12
PROBLEM SOLVING
.................................
12-14
Troubleshooting
....................................
12-13
Product Maintenance
.................................
14
If You Need Service
...................................
14
PRODUCT WARRANTY
.................................
14
What Is Covered
........................................
14
What Is Not Covered
..................................
14
Purpose of This Manual
Product Registration
What to Do
1.
Begin by ensuring proper installation and
grounding of the appliance by a qualified
technician according to the accompanying
Installation Instructions. Have the installer
show you where the fuse or junction box
and gas valve are located so that you
know how and where to turn off the utilities.
If you smell gas, do not use the range.
Immediately turn off the gas supply at the
shut off valve, disconnect electrical power
to the unit at the fuse or junction box,
and contact the gas supplier or qualified
appliance technician.
2.
Ensure that the range is used only by
those individuals who are able to operate it
properly.
3.
Use the range only for cooking tasks
expected of a home oven as outlined in
this manual.
4.
Properly clean and maintain the range as
recommended in this manual.
5.
Use only dry potholders to avoid steam
burns when removing hot cookware.
6.
Exercise caution when opening the oven
door. Let hot air or steam escape before
looking or reaching into the oven.
7.
Allow the oven cool air intake (located at
the door handle) to remain unobstructed at
all times.
8.
Position oven racks in desired locations
when the oven is cool. (If a rack must be
repositioned after the oven is already hot,
be certain that the potholder does not
contact a hot heating element in the oven.)
9.
Before Self-Cleaning the oven, remove the
broiler grill and pan, oven racks, convection
fan filter and any other utensils.
10.
Clean only those parts listed in this
manual.
11.
In the event that a burner flame goes out
and gas escapes, turn off the gas control
and open a window or door. Wait at least
5 minutes before attempting to use the
cooktop.