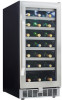
Danby DWC93BLSST Product Manual - Page 10
Installation Instructions - Door Swing Reversal
 |
View all Danby DWC93BLSST manuals
Add to My Manuals
Save this manual to your list of manuals |
Page 10 highlights
Installation Instructions - Door Swing Reversal Fig 1A Fig 1B Fig 1C Fig 1D Fig 1E 1 Bottom hinge (Right) 6 Top hinge (Right) 9 Top hinge (Left) 2 Screws 7 Decorative Nail 10 Decorative nail 3 Door axis 8 Screws 11 Bottom hinge (Left) 1ˊOpen the door 90° and take out the 2 screws from the lower door axis (3). Remove the door refer Fig. 1A and pull out the door and door axis (Fig. 1A). 2ˊPut the door safely aside and take out decorative nail (7) from the top of the door frame. 3ˊTake out the 3 screws (8) from the top hinge (right) (6) and remove the right top hinge. (Fig. 1C) 4ˊInstall the spare top hinge (Left) (9) at top left of the cabinet with 3 screws. (Fig. 1D) 5ˊAccording to the above procedure, install the spare lower hinge (left) (11) onto the lower left of the cabinet. (Fig. 1E) 6ˊRevolve the door 180° and install the door the same way it was removed and fix it with door alignment. Please note: Do not lay unit on it's back. 9
-
 1
1 -
2
-
3
-
4
-
 5
5 -
 6
6 -
 7
7 -
 8
8 -
 9
9 -
 10
10 -
 11
11 -
 12
12 -
 13
13 -
 14
14 -
 15
15 -
16
-
17
-
18
-
19
-
20
-
21
-
22
-
23
-
24
-
25
-
26
 |
 |
