Danby DWC93BLSST Product Manual - Page 5
Leveling, Instruction
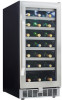 |
View all Danby DWC93BLSST manuals
Add to My Manuals
Save this manual to your list of manuals |
Page 5 highlights
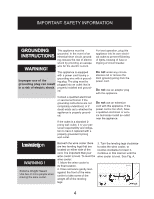
IMPORTANT SAFETY INFORMATION GROUNDING This appliance must be INSTRUCTIONS grounded. In the event of an electrical short circuit, ground- ing reduces the risk of electric shock by providing an escape WARNING! wire for the electric current. This appliance is equipped with a power cord having a grounding wire with a ground- Improper use of the ing plug. The plug must be grounding plug can result plugged into an outlet that is in a risk of electric shock. properly installed and ground- ed. Consult a qualified electrician or service technician if the grounding instructions are not completely understood, or if doubt exists as to whether the appliance is properly grounded. If the outlet is a standard 2prong wall outlet, it is your personal responsibility and obligation to have it replaced with a properly grounded 3-prong wall outlet. For best operation, plug this appliance into its own electrical outlet to prevent flickering of lights, blowing of fuse or tripping of circuit breaker. Do not under any circum- stances cut or remove the third (ground) prong from the power cord. Do not use an adapter plug with this appliance. Do not use an extension cord with this appliance. If the power cord is too short, have a qualified electrician or service technician install an outlet near the appliance. ILnesvtreulicntgion WARNING ! Extreme Weight Hazard Use two or more people when moving the wine cooler. Beneath the wine cooler there 3. Turn the leveling legs clockwise are two leveling legs that are to raise the wine cooler, or located on either side of the counter-clockwise to lower it. vent. It is important that your Continue in this manner until the wine cooler is level. To level the wine cooler is level. See Fig. A. wine cooler: 1. Move the wine cooler to its final location. 2. Have someone gently lean against the front of the wine cooler to take some of the weight off of the leveling legs. 4
-
 1
1 -
 2
2 -
 3
3 -
 4
4 -
 5
5 -
 6
6 -
 7
7 -
 8
8 -
 9
9 -
 10
10 -
 11
11 -
12
-
13
-
14
-
15
-
16
-
17
-
18
-
19
-
20
-
21
-
22
-
23
-
24
-
25
-
26
 |
 |
