Dell 1320c User Guide - Page 112
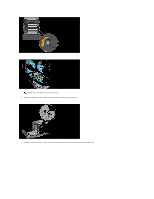
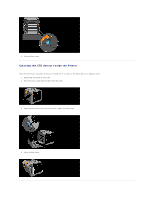
Removing the Used Separator Roller in the Tray 1, Installing the New Separator Roller in the Tray
 |
UPC - 662919013061
View all Dell 1320c manuals
Add to My Manuals
Save this manual to your list of manuals |
Page 112 highlights
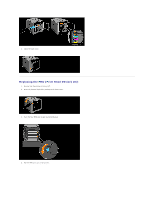
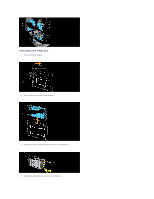
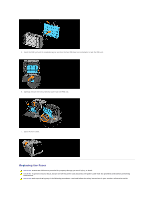
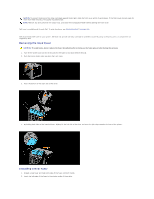
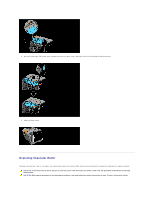
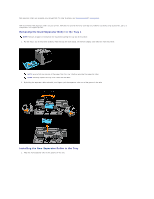
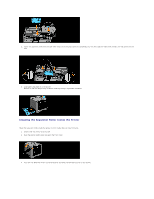
Dell separator rollers are available only through Dell. To order by phone, see "Contacting Dell™" on page 215. Dell recommends Dell separator rollers for your printer. Dell does not provide warranty coverage for problems caused by using accessories, parts, or components not supplied by Dell. Removing the Used Separator Roller in the Tray 1 NOTE: Remove all paper or media from the tray before pulling the tray out of the printer. 1. Pull the Tray 1 out of the printer carefully. Hold the tray with both hands, lift the front slightly, and remove it from the printer. NOTE: Ensure that you remove all the paper from the Tray 1 before removing the separator roller. NOTE: Carefully replace the Tray 1 so it does not fall down. 2. By holding the separator roller tabs with your fingers, pull the separator roller out of the groove in the axle. Installing the New Separator Roller in the Tray 1. Align the new separator roller to the groove on the axle.
-
 1
1 -
2
-
3
-
4
-
5
-
6
-
7
-
8
-
9
-
10
-
11
-
12
-
13
-
14
-
15
-
16
-
17
-
18
-
19
-
20
-
21
-
22
-
23
-
24
-
25
-
26
-
27
-
28
-
29
-
30
-
31
-
32
-
33
-
34
-
35
-
36
-
37
-
38
-
39
-
40
-
41
-
42
-
43
-
44
-
45
-
46
-
47
-
48
-
49
-
50
-
51
-
52
-
53
-
54
-
55
-
56
-
57
-
58
-
59
-
60
-
61
-
62
-
63
-
64
-
65
-
66
-
67
-
68
-
69
-
70
-
71
-
72
-
73
-
74
-
75
-
76
-
77
-
78
-
79
-
80
-
81
-
82
-
83
-
84
-
85
-
86
-
87
-
88
-
89
-
90
-
91
-
92
-
93
-
94
-
95
-
96
-
97
-
98
-
99
-
100
-
101
-
102
-
103
-
104
-
105
-
106
-
 107
107 -
 108
108 -
 109
109 -
 110
110 -
 111
111 -
 112
112 -
 113
113 -
 114
114 -
 115
115 -
 116
116 -
 117
117 -
118
-
119
-
120
-
121
-
122
-
123
-
124
-
125
-
126
-
127
-
128
-
129
-
130
-
131
-
132
-
133
-
134
-
135
-
136
-
137
 |
 |
