Dell 3007WFP User Guide - Page 20
Setting Up Your Monitor
 |
View all Dell 3007WFP manuals
Add to My Manuals
Save this manual to your list of manuals |
Page 20 highlights
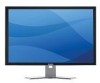
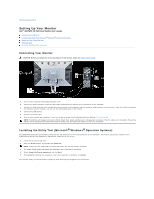
Back to Contents Page Setting Up Your Monitor Dell™ 3007WFP-HC Flat Panel Monitor User's Guide Connecting Your Monitor Installing the Utility Tool (Microsoft® Windows® Operation Systems) Using the Front Panel Buttons Using the OSD Using the Dell Soundbar (Optional) Connecting Your Monitor CAUTION: Before you begin any of the procedures in this section, follow the safety instructions. 1. Turn off your computer and unplug the power cord. 2. Connect the white connector end of the DVI cable attached on the monitor to the connectors on the computer. Connect the USB cable that was included with your monitor to the computer and the upstream USB connector on the monitor. Once this cable is connected to 3. the computer and the monitor, you can use the USB downstream on the monitor. 4. Connect any USB devices. 5. Connect the power cord. 6. Turn on your monitor and computer. If you do not see an image, see Troubleshooting Your Monitor. Troubleshooting. NOTE: The Monitor will display full screen in White, Black, Red, Green and Blue color rolling pattern on screen if the DVI cable is not connected. This self test pattern will be displayed continually when Monitor detects that DVI cable from Monitor to PC is not connected. Installing the Utility Tool (Microsoft® Windows® Operation Systems) The setup.exe application tool launcher provided in the CD allows you to the install utility tool on the computer. This feature queries the monitor for the brightness parameter and displays the adjustment range bar on the screen. 1. Insert the CD into the CD drive. 2. Open the Drivers folder and double-click setup.exe. NOTE: Ensure that the USB cable is connected between the monitor and the computer. 3. The install Shield wizard will launch the application tool. Click Next to countinue. 4. Select Accept the license agreement and click Next. 5. Click Install to complete the installation. After the installation is complete, click Finish. You are now ready to view adjustment range bar while adjusting the brightness on the monitor.
-
 1
1 -
2
-
3
-
4
-
5
-
6
-
7
-
8
-
9
-
10
-
11
-
12
-
13
-
14
-
 15
15 -
 16
16 -
 17
17 -
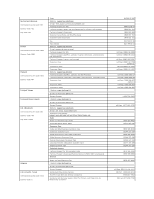 18
18 -
 19
19 -
 20
20 -
 21
21 -
 22
22 -
 23
23 -
 24
24 -
 25
25
 |
 |