Dell 810 All In One Inkjet Printer User's Guide - Page 3
Setting Up Your Printer, Using the Operator Panel, Loading Paper
 |
View all Dell 810 All In One Inkjet Printer manuals
Add to My Manuals
Save this manual to your list of manuals |
Page 3 highlights
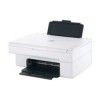
10 Operator panel 11 Scanner glass NOTE: Insert the power cable into the printer before connecting the power cable into the wall outlet. Panel on the printer you use to control copying and scanning. For more information, see Using the Operator Panel. Surface on which you place your document or photo face down to copy, fax, or scan it. Setting Up Your Printer NOTE: The Dell AIO Printer 810 supports Microsoft® Windows® 2000, Windows XP, and Windows XP Professional x64 Edition. Follow the instructions on your Setting Up Your Printer poster to install the hardware and software. If you encounter problems during setup, see Setup Problems. Using the Operator Panel The operator panel buttons allow you to copy and scan documents or photos. The printer is on when the Power button is illuminated. Use the 1 Copy button 2 Scan button 3 Power button To Make a copy of a document or photo. l Initiate a scan of a document or photo. l Print, and then scan, an alignment page. For more information, see Aligning an Ink Cartridge. Turn your printer on or off. Loading Paper 1. Fan the paper. 2. Place the paper against the guide on the right side of the paper support. 3. Squeeze and slide the left paper guide to the left edge of the paper. NOTE: Do not force paper into the printer. The paper should be flat against the paper support surface, and the edges of the paper should be flush against both paper guides.
-
 1
1 -
 2
2 -
 3
3 -
 4
4 -
 5
5 -
 6
6 -
 7
7 -
 8
8 -
 9
9 -
10
-
11
-
12
-
13
-
14
-
15
-
16
-
17
-
18
-
19
-
20
-
21
-
22
-
23
-
24
-
25
-
26
-
27
-
28
-
29
-
30
-
31
-
32
-
33
-
34
-
35
-
36
-
37
-
38
-
39
-
40
-
41
-
42
-
43
-
44
-
45
-
46
-
47
-
48
-
49
-
50
-
51
 |
 |
