Dell 924 All-in-One Photo Printer Owner's Manual - Page 34
Saving an Image on Your Computer, E-mailing a Scanned Image or Document
 |
View all Dell 924 All-in-One Photo Printer manuals
Add to My Manuals
Save this manual to your list of manuals |
Page 34 highlights
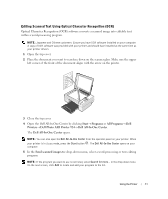
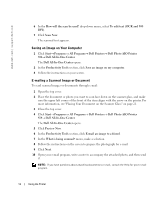
www.dell.com | support.dell.com 6 In the How will the scan be used? drop-down menu, select To edit text (OCR and 300 DPI). 7 Click Scan Now. The scanned text appears. Saving an Image on Your Computer 1 Click Start→ Programs or All Programs→ Dell Printers→ Dell Photo AIO Printer 924→ Dell All-In-One Center. The Dell All-In-One Center opens. 2 In the Productivity Tools section, click Save an image on my computer. 3 Follow the instructions on your screen. E-mailing a Scanned Image or Document To send scanned images or documents through e-mail: 1 Open the top cover. 2 Place the document or photo you want to scan face down on the scanner glass, and make sure the upper left corner of the front of the item aligns with the arrow on the printer. For more information, see "Placing Your Document on the Scanner Glass" on page 21. 3 Close the top cover. 4 Click Start→ Programs or All Programs→ Dell Printers→ Dell Photo AIO Printer 924→ Dell All-In-One Center. The Dell All-In-One Center opens. 5 Click Preview Now. 6 In the Productivity Tools section, click E-mail an image to a friend. 7 In the What is being scanned? menu, make a selection. 8 Follow the instructions on the screen to prepare the photograph for e-mail. 9 Click Next. 10 Open your e-mail program, write a note to accompany the attached photo, and then send it. NOTE: If you have questions about attaching documents to e-mail, consult the Help for your e-mail program. 34 Using the Printer
-
 1
1 -
2
-
3
-
4
-
5
-
6
-
7
-
8
-
9
-
10
-
11
-
12
-
13
-
14
-
15
-
16
-
17
-
18
-
19
-
20
-
21
-
22
-
23
-
24
-
25
-
26
-
27
-
28
-
 29
29 -
 30
30 -
 31
31 -
 32
32 -
 33
33 -
 34
34 -
 35
35 -
 36
36 -
 37
37 -
 38
38 -
 39
39 -
40
-
41
-
42
-
43
-
44
-
45
-
46
-
47
-
48
-
49
-
50
-
51
-
52
-
53
-
54
-
55
-
56
-
57
-
58
-
59
-
60
-
61
-
62
-
63
-
64
-
65
-
66
-
67
-
68
-
69
-
70
-
71
-
72
-
73
-
74
-
75
-
76
-
77
-
78
-
79
-
80
-
81
-
82
-
83
-
84
-
85
-
86
-
87
-
88
-
89
-
90
-
91
-
92
-
93
-
94
 |
 |
