Dell Alienware Aurora R13 Service Manual - Page 75
VR heat sinks, Removing the VR heat sink
 |
View all Dell Alienware Aurora R13 manuals
Add to My Manuals
Save this manual to your list of manuals |
Page 75 highlights
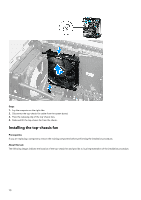
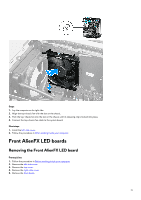
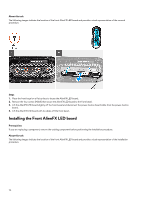
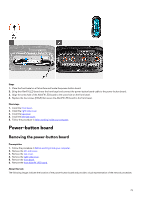
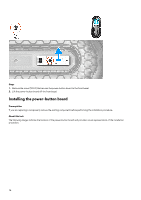
Steps 1. Align the screw hole on the power-button board with the screw hole on the front bezel. 2. Replace the screw (M2x3) that secures the power-button board to the front bezel. Next steps 1. Install the front AlienFX LED board. 2. Install the front bezel. 3. Install the right-side cover. 4. Install the top cover. 5. Install the left-side cover. 6. Follow the procedure in After working inside your computer. VR heat sinks Removing the VR heat sink Prerequisites 1. Follow the procedure in Before working inside your computer. NOTE: The heat sink may become hot during normal operation. Allow sufficient time for the heat sink to cool before you touch it. CAUTION: If either the processor or the heat sink is replaced, use the thermal grease that is provided in the kit to ensure that thermal conductivity is achieved. NOTE: Do not touch the heat transfer areas on the heat sink. The oils in your skin can reduce the heat transfer capability of the thermal grease. NOTE: The VR heat sinks are shipped as separate units and they do not ship along with the new system board. Remove the VR heat sinks from old system board for transfer to the new system board. 2. Remove the left-side cover. 75
-
 1
1 -
2
-
3
-
4
-
5
-
6
-
7
-
8
-
9
-
10
-
11
-
12
-
13
-
14
-
15
-
16
-
17
-
18
-
19
-
20
-
21
-
22
-
23
-
24
-
25
-
26
-
27
-
28
-
29
-
30
-
31
-
32
-
33
-
34
-
35
-
36
-
37
-
38
-
39
-
40
-
41
-
42
-
43
-
44
-
45
-
46
-
47
-
48
-
49
-
50
-
51
-
52
-
53
-
54
-
55
-
56
-
57
-
58
-
59
-
60
-
61
-
62
-
63
-
64
-
65
-
66
-
67
-
68
-
69
-
 70
70 -
 71
71 -
 72
72 -
 73
73 -
 74
74 -
 75
75 -
 76
76 -
 77
77 -
 78
78 -
 79
79 -
 80
80 -
81
-
82
-
83
-
84
-
85
-
86
-
87
-
88
-
89
-
90
-
91
-
92
-
93
-
94
-
95
-
96
-
97
-
98
-
99
-
100
-
101
-
102
-
103
-
104
-
105
 |
 |
