Dell Alienware M11x R2 Mobile Manual - Page 65
in the lower connector before you install a memory module in the upper connector.
 |
View all Dell Alienware M11x R2 manuals
Add to My Manuals
Save this manual to your list of manuals |
Page 65 highlights
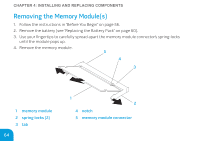
CHAPTER 4: INSTALLING AND REPLACING COMPONENTS To replace the memory modules, perform the removal steps in reverse order. While inserting the memory module into the connector align the notch on the memory module with the tab on the memory module connector. NOTE: If you need to install memory modules in two connectors, install a memory module in the lower connector before you install a memory module in the upper connector. NOTE: If the memory module is not installed properly, the computer may not boot. 65
-
 1
1 -
2
-
3
-
4
-
5
-
6
-
7
-
8
-
9
-
10
-
11
-
12
-
13
-
14
-
15
-
16
-
17
-
18
-
19
-
20
-
21
-
22
-
23
-
24
-
25
-
26
-
27
-
28
-
29
-
30
-
31
-
32
-
33
-
34
-
35
-
36
-
37
-
38
-
39
-
40
-
41
-
42
-
43
-
44
-
45
-
46
-
47
-
48
-
49
-
50
-
51
-
52
-
53
-
54
-
55
-
56
-
57
-
58
-
59
-
 60
60 -
 61
61 -
 62
62 -
 63
63 -
 64
64 -
 65
65 -
 66
66 -
 67
67 -
 68
68 -
 69
69 -
 70
70 -
71
-
72
-
73
-
74
-
75
-
76
-
77
-
78
-
79
-
80
-
81
-
82
-
83
-
84
-
85
-
86
-
87
-
88
-
89
-
90
-
91
-
92
-
93
-
94
-
95
-
96
-
97
-
98
-
99
-
100
-
101
-
102
-
103
-
104
-
105
-
106
-
107
-
108
-
109
-
110
-
111
-
112
 |
 |

CHAPTER 4: IN°TALLING AND REPLACING COMPONENT°
65
To replace the memory modules, perform the removal steps in reverse order. While inserting
the memory module into the connector align the notch on the memory module with the tab
on the memory module connector.
NOTE:
If you need to install memory modules in two connectors, install a memory module
in the lower connector before you install a memory module in the upper connector.
NOTE:
If the memory module is not installed properly, the computer may not boot.