Dell Alienware M11x R2 Mobile Manual - Page 66
Upgrading or Replacing the Hard Drive Assembly
 |
View all Dell Alienware M11x R2 manuals
Add to My Manuals
Save this manual to your list of manuals |
Page 66 highlights
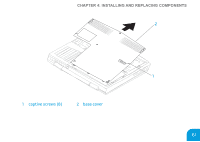
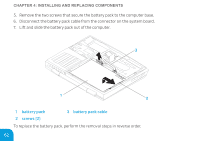
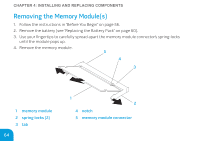
CHAPTER 4: INSTALLING AND REPLACING COMPONENTS Upgrading or Replacing the Hard Drive Assembly Your laptop is equipped with one hard drive socket. Removing the Hard Drive 1. Follow the instructions in "Before You Begin" on page 56. 2. Remove the battery (see "Replacing the Battery Pack" on page 60). 3. Loosen the three captive screws on the hard drive assembly. 4. Using the pull-tab, slide and lift the hard drive assembly to disconnect it from the system board connector. 5. Lift the hard-drive assembly out of the computer base. 66
-
 1
1 -
2
-
3
-
4
-
5
-
6
-
7
-
8
-
9
-
10
-
11
-
12
-
13
-
14
-
15
-
16
-
17
-
18
-
19
-
20
-
21
-
22
-
23
-
24
-
25
-
26
-
27
-
28
-
29
-
30
-
31
-
32
-
33
-
34
-
35
-
36
-
37
-
38
-
39
-
40
-
41
-
42
-
43
-
44
-
45
-
46
-
47
-
48
-
49
-
50
-
51
-
52
-
53
-
54
-
55
-
56
-
57
-
58
-
59
-
60
-
 61
61 -
 62
62 -
 63
63 -
 64
64 -
 65
65 -
 66
66 -
 67
67 -
 68
68 -
 69
69 -
 70
70 -
 71
71 -
72
-
73
-
74
-
75
-
76
-
77
-
78
-
79
-
80
-
81
-
82
-
83
-
84
-
85
-
86
-
87
-
88
-
89
-
90
-
91
-
92
-
93
-
94
-
95
-
96
-
97
-
98
-
99
-
100
-
101
-
102
-
103
-
104
-
105
-
106
-
107
-
108
-
109
-
110
-
111
-
112
 |
 |

CHAPTER 4: IN°TALLING AND REPLACING COMPONENT°
66
Upgrading or Replacing the Hard Drive Assembly
Your laptop is equipped with one hard drive socket.
Removing the Hard Drive
Follow the instructions in “Before You Begin” on page
1.
56.
Remove the battery (see “Replacing the Battery Pack” on page
2.
6
0
).
Loosen the three captive screws on the hard drive assembly.
3.
Using the pull-tab, slide and lift the hard drive assembly to disconnect it from the system
4.
board connector.
Lift the hard-drive assembly out of the computer base.
5.