Dell DX6000G Dell DX Object Storage Platform User's Guide - Page 23
Installing the System in a Rack, Cabling the Appliance, Turning On the DX Storage Node
 |
View all Dell DX6000G manuals
Add to My Manuals
Save this manual to your list of manuals |
Page 23 highlights
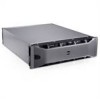
Installing the System in a Rack If the DX6axyS system includes a rail kit, locate the Rack Installation Instructions supplied with the rail kit. Follow the instructions to install the rails in the rack unit and to install the DX6axyS system in the rack. Cabling the Appliance Locate the Dell DX6axyS Getting Started Guide that shipped with your system and follow the instructions to attach the power cables and network cables to the DX6axyS system. Connect the network ports to the cluster's private network on the same IP subnet as the other storage nodes. The DX Storage Node is preconfigured to network boot from the DX Cluster Services Node and the NIC ports are preconfigured in balanced-alb modes. Turning On the DX Storage Node After cabling the storage node, turn it on, and verify that the network boot is successful. NOTE: If the network boot is not successful, verify that the cables are correctly connected to the private network. Enabling Capacity in DX Cluster Services Console The DX Storage Cluster capacity is licensed. To expand the cluster capacity, you must purchase a capacity license. When you purchase a capacity license, you receive a capacity license card that contains an activation code. Enter the activation code in the DX Cluster Services console to enable the additional cluster capacity. NOTE: The capacity is only applicable to the cluster in which it is entered. To activate the additional capacity, follow the instructions in the Cluster Services Node Installation and Configuration Guide. Setting Up the DX Object Storage Platform 23
-
 1
1 -
2
-
3
-
4
-
5
-
6
-
7
-
8
-
9
-
10
-
11
-
12
-
13
-
14
-
15
-
16
-
17
-
 18
18 -
 19
19 -
 20
20 -
 21
21 -
 22
22 -
 23
23 -
 24
24 -
 25
25 -
 26
26 -
 27
27 -
 28
28 -
29
-
30
-
31
-
32
-
33
-
34
-
35
-
36
-
37
-
38
-
39
-
40
-
41
-
42
-
43
-
44
-
45
-
46
-
47
-
48
 |
 |
