Dell EqualLogic PS6210XV PS6210 Hardware Owners Manual - Page 16
Removing a 2.5-inch Drive, Removing a 2.5-Inch Drive
 |
View all Dell EqualLogic PS6210XV manuals
Add to My Manuals
Save this manual to your list of manuals |
Page 16 highlights
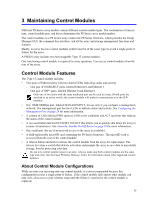
PS6210 Hardware Owner's Manual 2 Maintaining Drives For example, when you install a drive, the timer starts. If you install another drive before 2 minutes have elapsed, the timer is restarted. If no other drives are installed, the drive is configured after a delay of 2 minutes. • If you install a drive during RAID reconstruction or verification, the new drive will not be configured until the operation completes. Removing a 2.5-inch Drive 1. Remove the bezel. See Removing the Bezel on page 2. 2. Press the release button (callout 1 in Figure 10). The drive latch opens and the drive emerges partway from the array (callout 2). 3. Pull the drive out by the handle until it is free of the drive bay (callout 3). Figure 10: Removing a 2.5-Inch Drive 10
-
 1
1 -
2
-
3
-
4
-
5
-
6
-
7
-
8
-
9
-
10
-
 11
11 -
 12
12 -
 13
13 -
 14
14 -
 15
15 -
 16
16 -
 17
17 -
 18
18 -
 19
19 -
 20
20 -
 21
21 -
22
-
23
-
24
-
25
-
26
-
27
-
28
-
29
-
30
-
31
-
32
-
33
-
34
-
35
-
36
-
37
-
38
-
39
-
40
-
41
-
42
-
43
-
44
-
45
-
46
-
47
-
48
 |
 |
