Dell Latitude CPx H Service Manual - Page 31
NOTE: Use a magnetic screwdriver to reassemble the LCD panel in the dis, play. Secure the right side
 |
View all Dell Latitude CPx H manuals
Add to My Manuals
Save this manual to your list of manuals |
Page 31 highlights
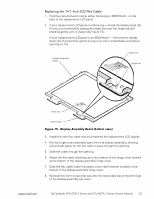
NOTE: Use a magnetic screwdriver to reassemble the LCD panel in the display. Secure the right side first. 1. Place the bottom edge of the LCD panel in the bottom of the top cover and elevate the top of the panel with your hand. 2. Carefully connect the LCD flex cable to the connector on the left edge of the LCD panel. Do not force the LCD flex cable into the connector. If you have trouble, check to make sure the LCD flex cable is aligned correctly and try again. 3. Lay the LCD panel in the top cover. 4. Reinstall the six 3-mm screws securing the LCD panel to the top cover. 24 Dell Latitude CPt V/CPt S Series and CPx H/CPx J Series Service Manual
-
 1
1 -
2
-
3
-
4
-
5
-
6
-
7
-
8
-
9
-
10
-
11
-
12
-
13
-
14
-
15
-
16
-
17
-
18
-
19
-
20
-
21
-
22
-
23
-
24
-
25
-
 26
26 -
 27
27 -
 28
28 -
 29
29 -
 30
30 -
 31
31 -
 32
32 -
 33
33 -
 34
34 -
 35
35 -
 36
36 -
37
-
38
-
39
-
40
-
41
-
42
-
43
-
44
-
45
-
46
-
47
-
48
 |
 |

24
Dell Latitude CPt V/CPt S Series and CPx H/CPx J Series Service Manual
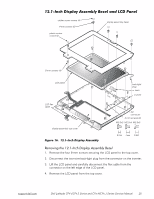
5HSOD²LQJ±WKH±¶·¸¶µ,Q²K±/&'±3DQHO
NOTE: Use a magnetic screwdriver to reassemble the LCD panel in the dis-
play. Secure the right side first.
1.
Place the bottom edge of the LCD panel in the bottom of the top cover and
elevate the top of the panel with your hand.
2.
Carefully connect the LCD flex cable to the connector on the left edge of
the LCD panel.
Do not force the LCD flex cable into the connector. If you have trouble,
check to make sure the LCD flex cable is aligned correctly and try again.
3.
Lay the LCD panel in the top cover.
4.
Reinstall the six 3-mm screws securing the LCD panel to the top cover.