Dell M4400 Service Manual - Page 10
Coin-Cell Battery - user manual
 |
View all Dell M4400 manuals
Add to My Manuals
Save this manual to your list of manuals |
Page 10 highlights
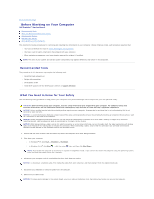
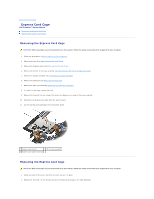
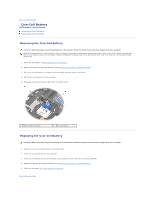
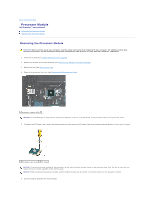
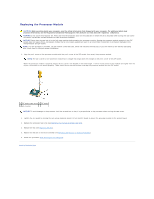
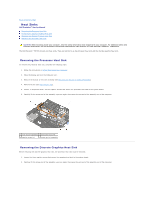
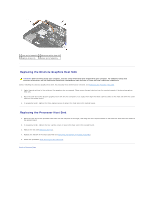
Back to Contents Page Coin-Cell Battery Dell Precision™ Service Manual Removing the Coin-Cell Battery Replacing the Coin-Cell Battery Removing the Coin-Cell Battery CAUTION: Before you begin any of the procedures in this section, follow the safety instructions that shipped with your computer. NOTICE: Disconnecting the coin-cell battery from the system board with no other power source causes the BIOS to reset to the default configuration and sets the realtime clock to the build date. System configuration changes made in the BIOS by the user must be re-entered, and the system clock must be set. 1. Follow the procedures in Before Working on Your Computer. 2. Remove the bottom of the base assembly (see Removing the Bottom of the Base Assembly). 3. Pry up the coin-cell battery to release the double-sided adhesive tape on the bottom. 4. Lift the coin-cell battery out of the computer. 5. Disconnect the coin-cell battery cable from the system board. 1 battery cable connector 2 coin-cell battery Replacing the Coin-Cell Battery CAUTION: Before you begin any of the procedures in this section, follow the safety instructions that shipped with your computer. 1. Connect the coin-cell battery cable to the system board. 2. Insert the coin-cell battery into the computer. 3. If you are re-installing the old coin-cell battery, press down to secure the tape to the base assembly. 4. Replace the bottom of the base assembly (see Replacing the Bottom of the Base Assembly). 5. Follow the procedure After Working on Your Computer. Back to Contents Page
-
 1
1 -
2
-
3
-
4
-
 5
5 -
 6
6 -
 7
7 -
 8
8 -
 9
9 -
 10
10 -
 11
11 -
 12
12 -
 13
13 -
 14
14 -
 15
15 -
16
-
17
-
18
-
19
-
20
-
21
-
22
-
23
-
24
-
25
-
26
-
27
-
28
-
29
-
30
-
31
-
32
-
33
-
34
-
35
-
36
-
37
-
38
-
39
-
40
-
41
-
42
-
43
-
44
-
45
-
46
-
47
-
48
-
49
-
50
-
51
-
52
-
53
-
54
-
55
-
56
-
57
-
58
-
59
-
60
-
61
-
62
-
63
-
64
-
65
-
66
-
67
-
68
-
69
-
70
-
71
-
72
 |
 |