Dell M4400 Service Manual - Page 8
Express Card Cage - replace keyboard
 |
View all Dell M4400 manuals
Add to My Manuals
Save this manual to your list of manuals |
Page 8 highlights
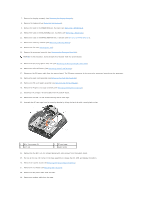
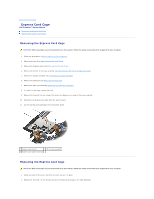
Back to Contents Page Express Card Cage Dell Precision™ Service Manual Removing the Express Card Cage Replacing the Express Card Cage Removing the Express Card Cage CAUTION: Before you begin any of the procedures in this section, follow the safety instructions that shipped with your computer. 1. Follow the procedures in Before Working on Your Computer. 2. Remove the hard drive (see Removing the Hard Drive). 3. Remove the modular drive (see Removing the Modular Drive). 4. Remove the bottom of the base assembly (see Removing the Bottom of the Base Assembly). 5. Remove the display assembly (see Removing the Display Assembly). 6. Remove the keyboard (see Removing the Keyboard). 7. Remove the palm rest assembly (Removing the Palm Rest Assembly). 8. If a card is in the cage, remove the card. 9. Remove the three M2 x 3-mm screws that secure the Express card cage to the base assembly. 10. Disconnect the Express card cable from the system board. 11. Lift the Express card cage away from the system board. 1 Express card carrier 2 M2 x 3-mm screw (3) 3 Express card cable connector Replacing the Express Card Cage CAUTION: Before you begin any of the procedures in this section, follow the safety instructions that shipped with your computer. 1. Attach one side of the carrier and then the other and set it in place. 2. Replace the three M2 x 3-mm screws to secure the Express card cage to the base assembly.
-
 1
1 -
2
-
 3
3 -
 4
4 -
 5
5 -
 6
6 -
 7
7 -
 8
8 -
 9
9 -
 10
10 -
 11
11 -
 12
12 -
 13
13 -
14
-
15
-
16
-
17
-
18
-
19
-
20
-
21
-
22
-
23
-
24
-
25
-
26
-
27
-
28
-
29
-
30
-
31
-
32
-
33
-
34
-
35
-
36
-
37
-
38
-
39
-
40
-
41
-
42
-
43
-
44
-
45
-
46
-
47
-
48
-
49
-
50
-
51
-
52
-
53
-
54
-
55
-
56
-
57
-
58
-
59
-
60
-
61
-
62
-
63
-
64
-
65
-
66
-
67
-
68
-
69
-
70
-
71
-
72
 |
 |