Dell OptiPlex GX100 Service Manual - Page 21
Computer Cover Replacement, Front Bezel, Front Bezel Removal
 |
View all Dell OptiPlex GX100 manuals
Add to My Manuals
Save this manual to your list of manuals |
Page 21 highlights
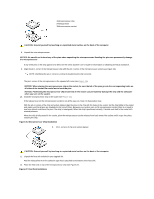
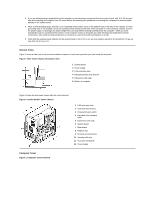
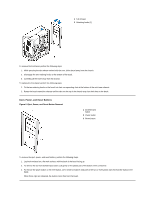
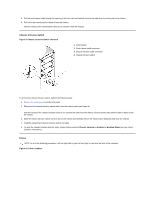
To remove the mini tower computer cover, perform the following steps: 1. Face the back of the computer and slide the upper half of the padlock ring to the left to unlock the cover release mechansism (see figure 3). 2. Face the left side cover and press the release button, located at the bottom-left corner of the front bezel (see Figure 3). 3. Lift the bottom of the cover, allowing it to pivot up toward you. 4. Disengage the tabs that secure the cover to the top of the chassis, and lift the cover away. Figure 4. Computer Cover Replacement 1 Hook 2 Recessed slot To replace the mini tower computer cover, perform the following steps: 1. Face the left side of the computer and hold the cover at a slight angle, as shown in Figure 4. 2. Align the top of the cover with the top of the chassis and insert the hooks on the cover into the recessed slots on the computer chassis so that the tabs catch the hooks inside the slots. 3. Pivot the cover down toward the bottom of the chassis and into position. Make sure that the securing hooks at the bottom of the cover click into place. 4. If you are using a padlock to secure your system, reinstall the padlock. Front Bezel Figure 5. Front Bezel Removal
-
 1
1 -
2
-
3
-
4
-
5
-
6
-
7
-
8
-
9
-
10
-
11
-
12
-
13
-
14
-
15
-
 16
16 -
 17
17 -
 18
18 -
 19
19 -
 20
20 -
 21
21 -
 22
22 -
 23
23 -
 24
24 -
 25
25 -
 26
26 -
27
-
28
-
29
-
30
-
31
-
32
-
33
-
34
-
35
-
36
-
37
-
38
-
39
-
40
-
41
-
42
-
43
-
44
-
45
-
46
-
47
-
48
-
49
-
50
-
51
-
52
-
53
-
54
-
55
-
56
-
57
-
58
-
59
 |
 |
