Dell OptiPlex GX100 Service Manual - Page 35
Dimms
 |
View all Dell OptiPlex GX100 manuals
Add to My Manuals
Save this manual to your list of manuals |
Page 35 highlights
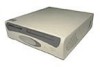
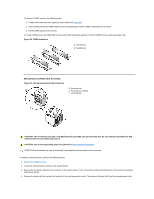
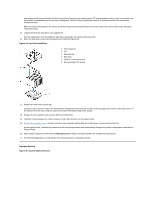
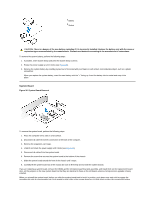
CAUTION: Some network cards automatically start up the system when they are connected. To guard against electrical shock, be sure to unplug your computer from its electrical outlet before installing any expansion cards. To install an expansion card, perform the following steps: 1. Prepare the expansion card for installation, and remove the computer cover. See the documentation that came with the expansion card for information on configuring the card, making internal connections, or otherwise customizing it for your system. 2. Remove the screw and remove the metal filler bracket that covers the card-slot opening for the expansion slot you intend to use (see Figure 28). Save the screw to use when installing the expansion card later in this procedure. Figure 28. Filler Bracket Removal 1 Filler bracket 3. Insert the expansion card into the expansion-card connector. If the expansion card is full-length, insert the front end of the card into the corresponding card guide on the inside front of the chassis as you insert the card into its connector. Insert the card's edge connector firmly into the expansion-card slot. 4. When the card is firmly seated in the connector, secure the card's mounting bracket to the chassis with the screw you removed in step 2. 5. Connect any cables that should be attached to the card. See the documentation provided with the card for information about the card's cable connections. 6. Replace the computer cover, and reconnect your computer and peripherals to their power sources and turn them on. NOTE: After you remove and replace the cover, the chassis intrusion detector will cause the following message to be displayed at the next system start-up: ALERT! Cover was previously removed. 7. To reset the chassis intrusion detector, enter System Setup and reset Chassis Intrusion to Enabled or Enabled-Silent. See the online System User's Guide for detailed instructions on the intrusion detector. NOTE: If a setup password has been assigned by someone else, contact your network administrator for information on resetting the chassis intrusion detector. DIMMs Figure 29. DIMM Removal 1 Ejectors (2) CAUTION: Use a wrist grounding strap as explained in "Precautionary Measures."
-
 1
1 -
2
-
3
-
4
-
5
-
6
-
7
-
8
-
9
-
10
-
11
-
12
-
13
-
14
-
15
-
16
-
17
-
18
-
19
-
20
-
21
-
22
-
23
-
24
-
25
-
26
-
27
-
28
-
29
-
 30
30 -
 31
31 -
 32
32 -
 33
33 -
 34
34 -
 35
35 -
 36
36 -
 37
37 -
 38
38 -
 39
39 -
 40
40 -
41
-
42
-
43
-
44
-
45
-
46
-
47
-
48
-
49
-
50
-
51
-
52
-
53
-
54
-
55
-
56
-
57
-
58
-
59
 |
 |