Dell OptiPlex GX100 Service Manual - Page 48
-Inch Diskette Drive
 |
View all Dell OptiPlex GX100 manuals
Add to My Manuals
Save this manual to your list of manuals |
Page 48 highlights
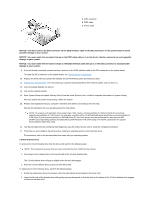
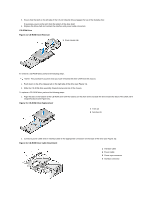
1 IDE1 connector 2 EIDE cable 3 Power cable NOTICE: You must connect the blue connector on the EIDE interface cable to the IDE1 connector on the system board to avoid possible damage to your system. NOTICE: You must match the red-colored stripe on the EIDE cable with pin 1 on the drive's interface connector to avoid possible damage to your system. NOTICE: You must match the red-colored stripe on the EIDE interface cable with pin 1 on the IDE1 connector to avoid possible damage to your system. 9. If it is not already connected, connect the blue connector on the EIDE interface cable to the IDE1 connector on the system board. To locate the IDE1 connector on the system board, see "System Board Components." 10. Replace the drive shelf and connect the diskette and CD-ROM drive power and interface cables. 11. Replace the computer cover. Then reconnect your computer and peripherals to their electrical outlets, and turn them on. 12. Insert a bootable diskette into drive A. 13. Turn on the computer system. 14. Enter System Setup and update Primary Drive 0 (see the online System User's Guide for complete information on System Setup). After you update the system setup settings, reboot the system. 15. Partition and logically format your computer's hard-disk drive before proceeding to the next step. See the documentation for your operating system for instructions. NOTE: On systems with hard-disk drives larger than 2 GB, create a primary partition of 2 GB and divide the remaining capacity into partitions of 2 GB or less. For example, a system with a 2.5-GB hard-disk drive would have a primary partition of 2 GB (drive C) and a second partition of 500 MB (drive D). Hard-disk drives must be partitioned this way because MSDOS®-based operating systems (including Microsoft® Windows NT®, when using a FAT16 file system) do not support drive partitions larger than 2 GB. 16. Test the hard-disk drive by running the Dell Diagnostics (see the online System User's Guide for complete information). 17. If the drive you just installed is the primary drive, install your operating system on the hard-disk drive. For instructions, refer to the documentation that came with your operating system. 3.5-Inch Diskette Drive To remove the 3.5-inch diskette drive from the drive shelf, perform the following steps: NOTE: This procedure assumes that you have removed the drive shelf from the chassis. 1. Press down on the release latch on the top left side of the 3.5-inch diskette drive. The 3.5-inch diskette drive will pop up slightly when the latch disengages. 2. Pivot the 3.5-inch diskette drive up and out of the drive shelf. To replace the 3.5-inch diskette drive, perform the following steps: 1. Rotate the replacement drive into position under the right diskette drive bracket on the drive shelf. 2. Lower the left side of the diskette drive while gently pressing downward, so that the slots on the bottom of the 3.5-inch diskette drive engage in hooks on the drive shelf.
-
 1
1 -
2
-
3
-
4
-
5
-
6
-
7
-
8
-
9
-
10
-
11
-
12
-
13
-
14
-
15
-
16
-
17
-
18
-
19
-
20
-
21
-
22
-
23
-
24
-
25
-
26
-
27
-
28
-
29
-
30
-
31
-
32
-
33
-
34
-
35
-
36
-
37
-
38
-
39
-
40
-
41
-
42
-
 43
43 -
 44
44 -
 45
45 -
 46
46 -
 47
47 -
 48
48 -
 49
49 -
 50
50 -
 51
51 -
 52
52 -
 53
53 -
54
-
55
-
56
-
57
-
58
-
59
 |
 |
