Dell PowerApp 200 Rack Installation Guide - Page 13

&rqwhqwv

Page 13 highlights

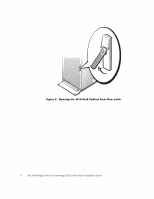
&RQWHQWV ,QGH[ )LJXUHV Rack Kit Contents 1 Before You Begin 2 Recommended Tools 2 Installing the Rack Kit 3 Removing the Doors From a 24-U or 42-U Rack 3 Installing the Slide Assemblies in the Rack 8 Installing the Systems in the Rack 11 Installing the Cable-Management Arm 13 Replacing the Doors 15 Figure 1. Figure 2. Figure 3. Figure 4. Figure 5. Figure 6. Figure 7. Figure 8. Figure 9. Figure 10. Figure 11. Figure 12. Rack Kit Contents 2 Opening the 24-U Rack Cabinet Front Door Latch 4 Opening the 42-U Rack Cabinet Front Door Latch 5 Removing the 24-U Rack Cabinet Doors 6 Removing the 42-U Rack Cabinet Doors 7 One Rack Unit 8 Using Template to Mark Vertical Rails 9 Installing the Slide Assemblies 10 Removing the System Bezel 11 Installing the System in the Rack 12 Installing the Cable-Management Arm 13 Attaching the Strain-Relief Bracket 14 xv

  • 1
  • 2
  • 3
  • 4
  • 5
  • 6
  • 7
  • 8
  • 9
  • 10
  • 11
  • 12
  • 13
  • 14
  • 15
  • 16
  • 17
  • 18
  • 19
  • 20
  • 21
  • 22
  • 23
  • 24
  • 25
  • 26
  • 27
  • 28
  • 29
  • 30
  • 31
  • 32

xv
&RQWHQWV
Rack Kit Contents . . . . . . . . . . . . . . . . . . . . . . . . . . . . . . . . . . . . . . . . . . . . . . . . . . . .1
Before You Begin . . . . . . . . . . . . . . . . . . . . . . . . . . . . . . . . . . . . . . . . . . . . . . . . . . . .2
Recommended Tools. . . . . . . . . . . . . . . . . . . . . . . . . . . . . . . . . . . . . . . . . . . . . .2
Installing the Rack Kit . . . . . . . . . . . . . . . . . . . . . . . . . . . . . . . . . . . . . . . . . . . . . . . . .3
Removing the Doors From a 24-U or 42-U Rack . . . . . . . . . . . . . . . . . . . . . . . . .3
Installing the Slide Assemblies in the Rack . . . . . . . . . . . . . . . . . . . . . . . . . . . . .8
Installing the Systems in the Rack . . . . . . . . . . . . . . . . . . . . . . . . . . . . . . . . . . . . . .11
Installing the Cable-Management Arm. . . . . . . . . . . . . . . . . . . . . . . . . . . . . . . .13
Replacing the Doors . . . . . . . . . . . . . . . . . . . . . . . . . . . . . . . . . . . . . . . . . . . . . . . . .15
,QGH[
)LJXUHV
Figure 1.
Rack Kit Contents . . . . . . . . . . . . . . . . . . . . . . . . . . . . . . . . . . . . . . . . .2
Figure 2.
Opening the 24-U Rack Cabinet Front Door Latch. . . . . . . . . . . . . . . . .4
Figure 3.
Opening the 42-U Rack Cabinet Front Door Latch. . . . . . . . . . . . . . . . .5
Figure 4.
Removing the 24-U Rack Cabinet Doors . . . . . . . . . . . . . . . . . . . . . . . .6
Figure 5.
Removing the 42-U Rack Cabinet Doors . . . . . . . . . . . . . . . . . . . . . . . .7
Figure 6.
One Rack Unit . . . . . . . . . . . . . . . . . . . . . . . . . . . . . . . . . . . . . . . . . . . .8
Figure 7.
Using Template to Mark Vertical Rails. . . . . . . . . . . . . . . . . . . . . . . . . .9
Figure 8.
Installing the Slide Assemblies . . . . . . . . . . . . . . . . . . . . . . . . . . . . . .10
Figure 9.
Removing the System Bezel . . . . . . . . . . . . . . . . . . . . . . . . . . . . . . . .11
Figure 10.
Installing the System in the Rack. . . . . . . . . . . . . . . . . . . . . . . . . . . . .12
Figure 11.
Installing the Cable-Management Arm . . . . . . . . . . . . . . . . . . . . . . . .13
Figure 12.
Attaching the Strain-Relief Bracket . . . . . . . . . . . . . . . . . . . . . . . . . . .14