Dell PowerConnect 2848 Getting Started Guide - Page 141
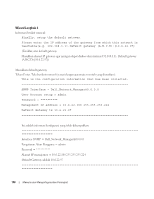
Wizard Langkah 3
 |
View all Dell PowerConnect 2848 manuals
Add to My Manuals
Save this manual to your list of manuals |
Page 141 highlights
You may setup other accounts and change privilege levels later. For more information on setting up user accounts and changing privilege levels,see the user documentation. To setup a user account: Enter the user name:[admin] Please enter the user password:***** Please reenter the user password:***** (Sekarang kita perlu mengatur akun pengguna khusus inisial (Level 15). Akun ini digunakan untuk login ke CLI, Telnet, dan interface web. Anda dapat mengatur akun lain dan mengubah level khusus di lain kesempatan. Untuk informasi lebih lanjut tentang cara mengatur akun pengguna dan mengubah level khusus, lihat dokumentasi pengguna. Untuk mengatur akun pengguna: Masukkan nama pengguna<1-20>:[admin] Masukkan password pengguna:***** Masukkan kembali password pengguna:*****) Wizard Langkah 3 Informasi berikut muncul: Next, an IP address is setup. The IP address is defined on the default VLAN,(VLAN #2). This is the IP address you use to access the Telnet, Web interface, or SNMP interface for the switch. To setup an IP address: Please enter the IP address of the device (A.B.C.D):10.6.22.100 Please enter the IP subnet mask (A.B.C.D or nn):[255.255.255.224] (Kemudian, alamat IP diatur. Kemudian, alamat IP diatur. Ini adalah alamat IP yang Anda gunakan untuk mengakses Telnet, interface web, atau interface SNMP untuk saklar. Untuk mengatur alamat IP: Masukkan alamat IP perangkat (A.B.C.D):10.6.22.100 Masukkan IP subnet mask (A.B.C.D atau nn):[255.255.255.224]) Memulai dan Mengonfigurasikan Perangkat 139
-
 1
1 -
2
-
3
-
4
-
5
-
6
-
7
-
8
-
9
-
10
-
11
-
12
-
13
-
14
-
15
-
16
-
17
-
18
-
19
-
20
-
21
-
22
-
23
-
24
-
25
-
26
-
27
-
28
-
29
-
30
-
31
-
32
-
33
-
34
-
35
-
36
-
37
-
38
-
39
-
40
-
41
-
42
-
43
-
44
-
45
-
46
-
47
-
48
-
49
-
50
-
51
-
52
-
53
-
54
-
55
-
56
-
57
-
58
-
59
-
60
-
61
-
62
-
63
-
64
-
65
-
66
-
67
-
68
-
69
-
70
-
71
-
72
-
73
-
74
-
75
-
76
-
77
-
78
-
79
-
80
-
81
-
82
-
83
-
84
-
85
-
86
-
87
-
88
-
89
-
90
-
91
-
92
-
93
-
94
-
95
-
96
-
97
-
98
-
99
-
100
-
101
-
102
-
103
-
104
-
105
-
106
-
107
-
108
-
109
-
110
-
111
-
112
-
113
-
114
-
115
-
116
-
117
-
118
-
119
-
120
-
121
-
122
-
123
-
124
-
125
-
126
-
127
-
128
-
129
-
130
-
131
-
132
-
133
-
134
-
135
-
 136
136 -
 137
137 -
 138
138 -
 139
139 -
 140
140 -
 141
141 -
 142
142 -
 143
143 -
 144
144 -
 145
145 -
 146
146 -
147
-
148
-
149
-
150
-
151
-
152
-
153
-
154
-
155
-
156
-
157
-
158
-
159
-
160
-
161
-
162
-
163
-
164
-
165
-
166
-
167
-
168
-
169
-
170
-
171
-
172
-
173
-
174
-
175
-
176
-
177
-
178
-
179
-
180
-
181
-
182
-
183
-
184
-
185
-
186
-
187
-
188
-
189
-
190
-
191
-
192
-
193
-
194
-
195
-
196
-
197
-
198
-
199
-
200
-
201
-
202
-
203
-
204
-
205
-
206
-
207
-
208
-
209
-
210
-
211
-
212
-
213
-
214
-
215
-
216
-
217
-
218
-
219
-
220
-
221
-
222
-
223
-
224
-
225
-
226
-
227
-
228
-
229
-
230
-
231
-
232
-
233
-
234
-
235
-
236
-
237
-
238
-
239
-
240
-
241
-
242
-
243
-
244
-
245
-
246
-
247
-
248
-
249
-
250
-
251
-
252
-
253
-
254
-
255
-
256
-
257
-
258
-
259
-
260
 |
 |