Dell PowerConnect 2848 Getting Started Guide - Page 45
Installationsassistent - Schritt 2, Installationsassistent - Schritt 3
 |
View all Dell PowerConnect 2848 manuals
Add to My Manuals
Save this manual to your list of manuals |
Page 45 highlights
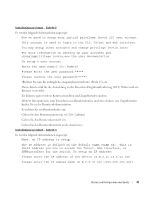
Installationsassistent - Schritt 2 Es werden folgende Informationen angezeigt: Now we need to setup your initial privilege (Level 15) user account. This account is used to login to the CLI, Telnet and Web interface. You may setup other accounts and change privilege levels later. For more information on setting up user accounts and changingprivilege levels,see the user documentation. To setup a user account: Enter the user name:[admin] Please enter the user password:***** Please reenter the user password:***** (Richten Sie nun Ihr anfängliches Zugangsbenutzerkonto (Stufe 15) ein. Dieses Konto wird für die Anmeldung an der Konsolen-Eingabeaufforderung (CLI), Telnet und am Internet verwendet. Sie können später weitere Konten einrichten und Zugriffsstufen ändern. Weitere Informationen zum Einrichten von Benutzerkonten und zum Ändern von Zugriffsstufen finden Sie in der Benutzerdokumentation. So richten Sie ein Benutzerkonto ein: Geben Sie den Benutzernamen ein : [admin] Geben Sie das Benutzerkennwort ein: Geben Sie das Benutzerkennwort noch einmal ein:) Installationsassistent - Schritt 3 Es werden folgende Informationen angezeigt: Next, an IP address is setup. The IP address is defined on the default VLAN,(VLAN #2). This is theIP address you use to access the Telnet, Web interface, or SNMPinterface for the switch. To setup an IP address: Please enter the IP address of the device (A.B.C.D):10.6.22.100 Please enter the IP subnet mask (A.B.C.D or nn):[255.255.255.224] Starten und Konfigurieren des Geräts 43
-
 1
1 -
2
-
3
-
4
-
5
-
6
-
7
-
8
-
9
-
10
-
11
-
12
-
13
-
14
-
15
-
16
-
17
-
18
-
19
-
20
-
21
-
22
-
23
-
24
-
25
-
26
-
27
-
28
-
29
-
30
-
31
-
32
-
33
-
34
-
35
-
36
-
37
-
38
-
39
-
 40
40 -
 41
41 -
 42
42 -
 43
43 -
 44
44 -
 45
45 -
 46
46 -
 47
47 -
 48
48 -
 49
49 -
 50
50 -
51
-
52
-
53
-
54
-
55
-
56
-
57
-
58
-
59
-
60
-
61
-
62
-
63
-
64
-
65
-
66
-
67
-
68
-
69
-
70
-
71
-
72
-
73
-
74
-
75
-
76
-
77
-
78
-
79
-
80
-
81
-
82
-
83
-
84
-
85
-
86
-
87
-
88
-
89
-
90
-
91
-
92
-
93
-
94
-
95
-
96
-
97
-
98
-
99
-
100
-
101
-
102
-
103
-
104
-
105
-
106
-
107
-
108
-
109
-
110
-
111
-
112
-
113
-
114
-
115
-
116
-
117
-
118
-
119
-
120
-
121
-
122
-
123
-
124
-
125
-
126
-
127
-
128
-
129
-
130
-
131
-
132
-
133
-
134
-
135
-
136
-
137
-
138
-
139
-
140
-
141
-
142
-
143
-
144
-
145
-
146
-
147
-
148
-
149
-
150
-
151
-
152
-
153
-
154
-
155
-
156
-
157
-
158
-
159
-
160
-
161
-
162
-
163
-
164
-
165
-
166
-
167
-
168
-
169
-
170
-
171
-
172
-
173
-
174
-
175
-
176
-
177
-
178
-
179
-
180
-
181
-
182
-
183
-
184
-
185
-
186
-
187
-
188
-
189
-
190
-
191
-
192
-
193
-
194
-
195
-
196
-
197
-
198
-
199
-
200
-
201
-
202
-
203
-
204
-
205
-
206
-
207
-
208
-
209
-
210
-
211
-
212
-
213
-
214
-
215
-
216
-
217
-
218
-
219
-
220
-
221
-
222
-
223
-
224
-
225
-
226
-
227
-
228
-
229
-
230
-
231
-
232
-
233
-
234
-
235
-
236
-
237
-
238
-
239
-
240
-
241
-
242
-
243
-
244
-
245
-
246
-
247
-
248
-
249
-
250
-
251
-
252
-
253
-
254
-
255
-
256
-
257
-
258
-
259
-
260
 |
 |
