Dell PowerConnect Brocade M6505 Quick Start Guide - Page 4
Insert additional SFP+ transceivers in the SAN I/O Module port (Optional
 |
View all Dell PowerConnect Brocade M6505 manuals
Add to My Manuals
Save this manual to your list of manuals |
Page 4 highlights
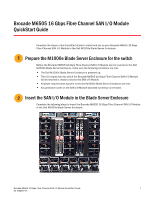
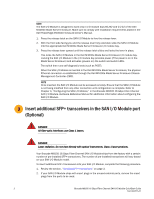
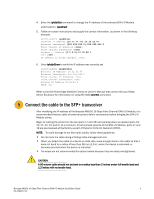
NOTE The SAN I/O Module is designed to work only in I/O module bays B1/B2 and C1/C2 of the Dell M1000e Blade Server Enclosure. Make sure to comply with installation requirements stated in the Dell PowerEdge M1000e Enclosure Owner's Manual. 1. Press the release latch on the SAN I/O Module to free the release lever. 2. With the front side facing you and the release lever fully extended, slide the SAN I/O Module into the appropriate Dell M1000e Blade Server Enclosure I/O module bay. 3. Press the release lever upward until the release latch clicks and locks the lever in place. This locks the SAN I/O Module in the Dell M1000e Blade Server Enclosure I/O module bay. Locking the SAN I/O Module in the I/O module bay provides power (if the power is on in the Blade Server Enclosure) and activates (powers on) the switch and switch LEDs. The switch then runs self-diagnostic tests (such as POST). When the SAN I/O Module is inserted in the Dell M1000e Blade Server Enclosure, the physical Ethernet connection is established through the Dell M1000e Blade Server Enclosure Chassis Management Controller (CMC). NOTE Once inserted, the SAN I/O Module can be accessed remotely. Ensure that the SAN I/O Module is not being modified from any other connection until configuration is complete. Refer to Chapter 3, "Configuring the SAN I/O Module," in the Brocade M6505 16 Gbps Fibre Channel SAN I/O Module Hardware Reference Manual for additional information about configuring the SAN I/O Module. 3 Insert additional SFP+ transceivers in the SAN I/O Module port (Optional) DANGER All fiber-optic interfaces use Class 1 lasers. DANGER Laser radiation. Do not view directly with optical instruments. Class 1 laser products. Your Brocade M6505 16 Gbps Fibre Channel SAN I/O Module ships from the factory with a certain number of pre-installed SFP+ transceivers. The number of pre-installed transceivers will vary based on your SAN I/O Module model. To insert additional SFP+ transceivers into your SAN I/O Module, complete the following procedure. 1. Review the section, "Handling SFP+ transceivers" on page 3. 2. If your SAN I/O Module ships with insert plugs in the unused external ports, remove the insert plugs from the ports to be used. 2 Brocade M6505 16 Gbps Fibre Channel SAN I/O Module QuickStart Guide 53-1002577-01
-
 1
1 -
 2
2 -
 3
3 -
 4
4 -
 5
5 -
 6
6 -
 7
7 -
 8
8 -
 9
9 -
 10
10
 |
 |