Dell PowerConnect Brocade M6505 Quick Start Guide - Page 5
Handling SFP+ transceivers, Set the IP address
 |
View all Dell PowerConnect Brocade M6505 manuals
Add to My Manuals
Save this manual to your list of manuals |
Page 5 highlights
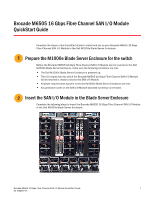
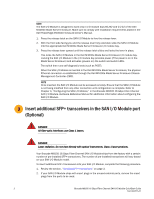
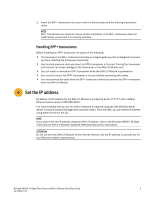
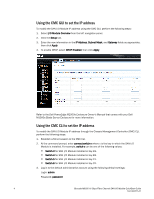
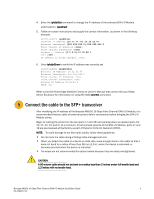
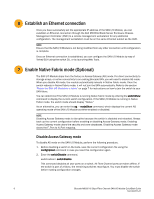
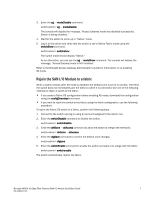
3. Insert the SFP+ transceiver into a port until it is firmly seated and the latching mechanism clicks. NOTE SFP+ Transceivers are keyed to ensure correct orientation. If an SFP+ transceiver does not install easily, ensure that it is correctly oriented. Handling SFP+ transceivers Before installing an SFP+ transceiver, be aware of the following: • The housing on the SFP+ transceiver includes an integral guide key that is designed to prevent you from inserting the transceiver incorrectly. • Use minimal pressure when you insert an SFP+ transceiver in the port. Forcing the transceiver into the port can cause damage to the transceiver or the SAN I/O Module port. • You can insert or remove an SFP+ transceiver while the SAN I/O Module is powered on. • You must first insert the SFP+ transceiver in the port before connecting the cables. • You must remove the cable from the SFP+ transceiver before you remove the SFP+ transceiver from the SAN I/O Module. 4 Set the IP address By default, the IP address for the SAN I/O Module is configured as 10.77.77.77 with a default Ethernet subnet mask of 255.255.255.0. It is recommended that you set the SAN I/O Module IP address using the Dell M1000e Blade Server Enclosure Chassis Management Controller (CMC). From the CMC, you can set the IP address using either the GUI or the CLI. NOTE If you want to set the IP address using the SAN I/O Module, refer to the Brocade M6505 16 Gbps Fibre Channel SAN I/O Module Hardware Reference Manual for instructions. ATTENTION Do not connect the SAN I/O Module to the internal network until the IP address is correctly set for your Ethernet network requirements. Brocade M6505 16 Gbps Fibre Channel SAN I/O Module QuickStart Guide 3 53-1002577-01
-
 1
1 -
 2
2 -
 3
3 -
 4
4 -
 5
5 -
 6
6 -
 7
7 -
 8
8 -
 9
9 -
 10
10
 |
 |