Dell PowerConnect W-AP124 Dell PowerConnect AP-120-MNT-WJ Access Point Enclosu - Page 2
Installing the AP Enclosure
 |
View all Dell PowerConnect W-AP124 manuals
Add to My Manuals
Save this manual to your list of manuals |
Page 2 highlights
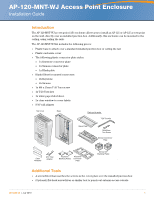
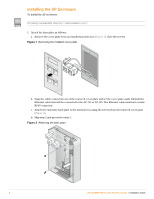
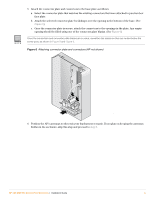
Installing the AP Enclosure To install the AP enclosure: NOTE For ceiling mounted APs, skip step 1 and proceed to step 2 1. Attach the base plate as follows: a. Remove the cover plate from an installed junction box (Figure 1). Save the screws. Figure 1 Removing the installed cover plate APenc_002 b. Snap the cable connectors out of the removed cover plate and set the cover plate aside. Identify the Ethernet cable that will be connected to the AP-121 or AP-125. The Ethernet cable must have a male RJ-45 connector. c. Attach the enclosure base plate to the junction box using the screws from the removed cover plate (Figure 2). d. Skip step 2 and proceed to step 3. Figure 2 Attaching the base plate APenc_003 2 AP-120-MNT-WJ Access Point Enclosure | Installation Guide
-
 1
1 -
 2
2 -
 3
3 -
 4
4 -
 5
5 -
 6
6 -
 7
7 -
 8
8
 |
 |