Dell PowerConnect W-AP124 Dell PowerConnect W-AP120-MNT-CV Access Point Enclos - Page 2
Installing the AP-120-MNT-CV on a Wall,
 |
View all Dell PowerConnect W-AP124 manuals
Add to My Manuals
Save this manual to your list of manuals |
Page 2 highlights
Installing the AP-120-MNT-CV on a Wall 1. Attach the base plate as follows: a. Remove the cover plate from an installed junction box (Figure 1). Save the screws. Figure 1 Removing the installed cover plate b. Identify the Ethernet cable or cables that will be connected to the AP-121 or AP-125. The Ethernet cable must have a male RJ-45 connector. c. Attach the mounting plate to the junction box using the screws from the removed cover plate (Figure 2). Figure 2 Installing the mounting plate AP120_001 2 AP-120-MNT-CV Access Point Enclosure | Installation Guide
-
 1
1 -
 2
2 -
 3
3 -
 4
4 -
 5
5 -
 6
6 -
 7
7 -
 8
8
 |
 |

2
AP-120-MNT-CV Access Point Enclosure
|
Installation Guide
Installing the AP-120-MNT-CV on a Wall
1.
Attach the base plate as follows:
a.
Remove the cover plate from an installed junction box (
Figure 1
). Save the screws.
Figure 1
Removing the installed cover plate
b.
Identify the Ethernet cable or cables that will be connected to the AP-121 or AP-125. The
Ethernet cable must have a male RJ-45 connector.
c.
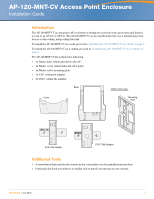
Attach the mounting plate to the junction box using the screws from the removed cover plate
(
Figure 2
).
Figure 2
Installing the mounting plate