Dell PowerConnect W-AP124 Dell PowerConnect W-AP120-MNT-CV Access Point Enclos - Page 6
Dell PowerConnect W-AP124 Manual
 |
View all Dell PowerConnect W-AP124 manuals
Add to My Manuals
Save this manual to your list of manuals |
Page 6 highlights
3. Pull the necessary cables through a prepared hole (Figure 9) in the ceiling tile near where the AP will be placed. 4. Connect the ethernet cable or cables to the AP. Ensure that the cables do not obstruct any of the connection points between the base and the cover. Figure 9 Cable path 5. Hold the enclosure base next to the ceiling rail with the ceiling rail at approximately a 30-degree angle to the ceiling tile rail (Figure 10). 6. Rotate the enclosure base clockwise until the device clicks into place on the ceiling rail. Figure 10 Installing the AP on a ceiling rail AP120_009 AP120_008 6 AP-120-MNT-CV Access Point Enclosure | Installation Guide
-
 1
1 -
 2
2 -
 3
3 -
 4
4 -
 5
5 -
 6
6 -
 7
7 -
 8
8
 |
 |

6
AP-120-MNT-CV Access Point Enclosure
|
Installation Guide
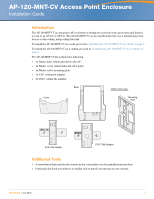
3.
Pull the necessary cables through a prepared hole (
Figure 9
) in the ceiling tile near where the AP
will be placed.
4.
Connect the ethernet cable or cables to the AP. Ensure that the cables do not obstruct any of the
connection points between the base and the cover.
Figure 9
Cable path
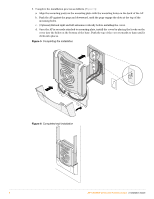
5.
Hold the enclosure base next to the ceiling rail with the ceiling rail at approximately a 30-degree
angle to the ceiling tile rail (
Figure 10
).
6.
Rotate the enclosure base clockwise until the device clicks into place on the ceiling rail.
Figure 10
Installing the AP on a ceiling rail