Dell PowerEdge 1900 Installing a SATA Optical Drive - Page 3
Installing a SATA Optical Drive, Removing an Existing Optical Drive - All Systems - manual
 |
View all Dell PowerEdge 1900 manuals
Add to My Manuals
Save this manual to your list of manuals |
Page 3 highlights
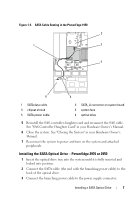
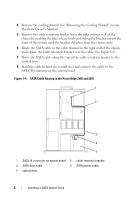
Installing a SATA Optical Drive These instructions apply to Dell™ PowerEdge™ systems to which a SATA optical drive is being added, or in which an existing PATA or IDE optical drive is being replaced by a SATA optical drive. WARNING: Only trained service technicians are authorized to remove the system cover and access any of the components inside the system. Before you begin this procedure, review the safety instructions that came with the system. Removing an Existing Optical Drive - All Systems 1 Turn off the system and attached peripherals, and disconnect the system from the electrical outlet. 2 Remove the bezel. See "Removing the Bezel" in your Hardware Owner's Manual. 3 Remove the system cover. See "Opening the System" in your Hardware Owner's Manual. 4 PowerEdge 1950 systems only: Disconnect and remove the SAS controller daughter card. See "Removing a SAS Controller Daughter Card" in your Hardware Owner's Manual. 5 Disconnect the data and power cables from the back of the optical drive. 6 PowerEdge 2900 and 1900 systems only: Perform the following steps. See your Hardware Owner's Manual for specific step instructions. a Disconnect the SAS cable from the SAS controller and pull the cable away from the center fan bracket. b Remove the center fans and the center fan bracket. c Release the spring latch at the top of the peripheral bay and remove the optical drive from the front of the bay. 7 For systems with a drive tray, release the blue tab at the back of the tray and slide the drive tray out of the system. Installing a SATA Optical Drive 3
-
 1
1 -
 2
2 -
 3
3 -
 4
4 -
 5
5 -
 6
6 -
 7
7 -
 8
8 -
 9
9 -
10
 |
 |