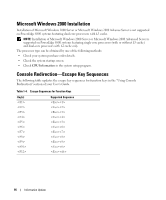
Dell PowerEdge 6800 Upgrade the BIOS Before Upgrading Your System (.pdf) - Page 16
Removing and Installing the Cooling Shroud
 |
View all Dell PowerEdge 6800 manuals
Add to My Manuals
Save this manual to your list of manuals |
Page 16 highlights
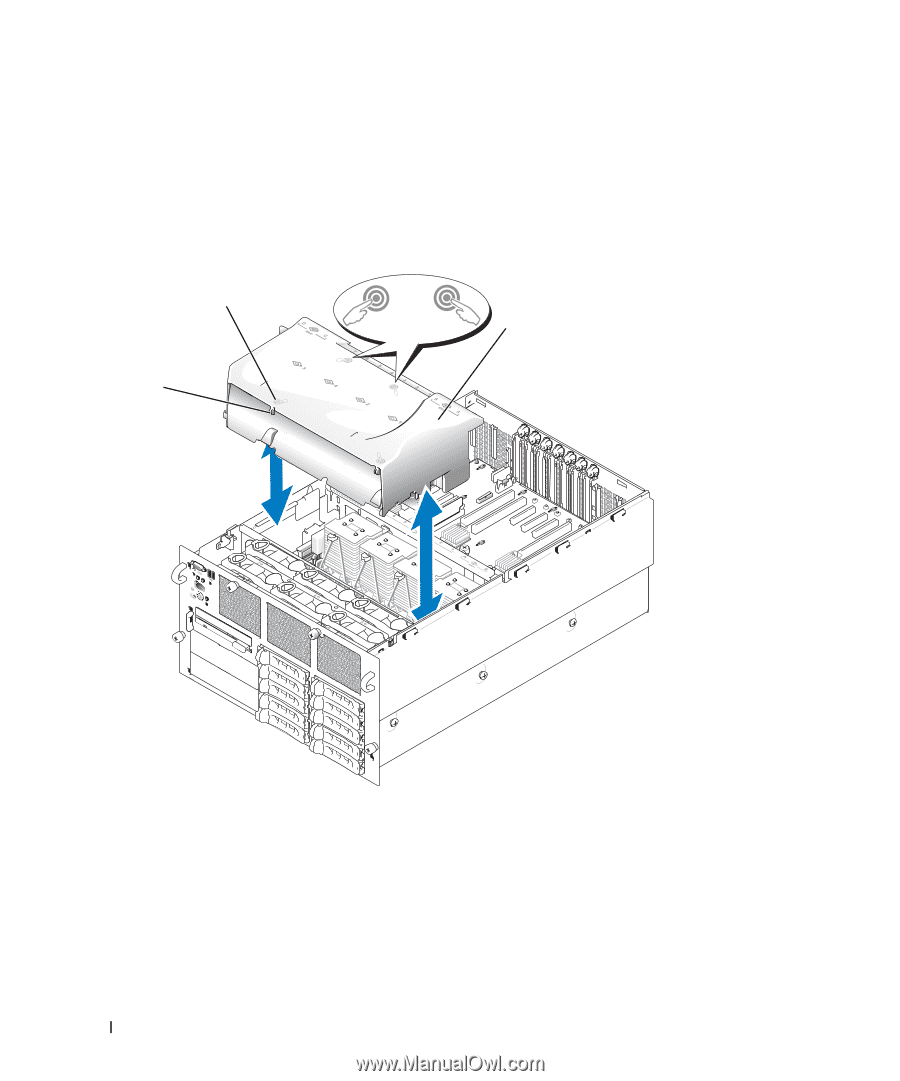
Removing and Installing the Cooling Shroud To remove the cooling shroud, grasp each end of the shroud and lift the shroud straight up from the system. To install the cooling shroud, slowly lower the shroud straight down into the system and then press down on the four icons (above the latches) until the shroud snaps into place. See Figure 1-2. Figure 1-2. Removing and Installing the Cooling Shroud icons (4) latches (4) cooling shroud 14 Information Update
-
 1
1 -
2
-
3
-
4
-
5
-
6
-
7
-
8
-
9
-
10
-
 11
11 -
 12
12 -
 13
13 -
 14
14 -
 15
15 -
 16
16 -
 17
17 -
 18
18 -
 19
19 -
 20
20 -
 21
21 -
22
-
23
-
24
-
25
-
26
-
27
-
28
-
29
-
30
-
31
-
32
-
33
-
34
-
35
-
36
-
37
-
38
-
39
-
40
-
41
-
42
-
43
-
44
-
45
-
46
-
47
-
48
-
49
-
50
-
51
-
52
-
53
-
54
-
55
-
56
-
57
-
58
-
59
-
60
-
61
-
62
-
63
-
64
-
65
-
66
-
67
-
68
-
69
-
70
-
71
-
72
-
73
-
74
-
75
-
76
-
77
-
78
-
79
-
80
-
81
-
82
-
83
-
84
-
85
-
86
-
87
-
88
-
89
-
90
-
91
-
92
-
93
-
94
-
95
-
96
-
97
-
98
-
99
-
100
-
101
-
102
-
103
-
104
-
105
-
106
-
107
-
108
-
109
-
110
-
111
-
112
-
113
-
114
-
115
-
116
-
117
-
118
-
119
-
120
-
121
-
122
-
123
-
124
-
125
-
126
 |
 |
14
Information Update
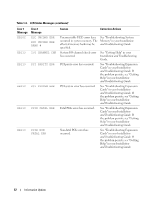
Removing and Installing the Cooling Shroud
To remove the cooling shroud, grasp each end of the shroud and lift the shroud straight up from the system.
To install the cooling shroud, slowly lower the shroud straight down into the system and then press down on
the four icons (above the latches) until the shroud snaps into place. See Figure 1-2.
Figure 1-2.
Removing and Installing the Cooling Shroud
cooling shroud
icons (4)
latches (4)