Dell PowerVault 200S Dell PowerVault 2xxS Storage Systems SCSI Backplane Board - Page 12
Install the Cooling Fans, Install the Power Supplies
 |
View all Dell PowerVault 200S manuals
Add to My Manuals
Save this manual to your list of manuals |
Page 12 highlights
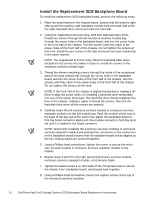
1. Carefully insert the replacement enclosure services module into the module bay. Push the module all the way to the back of the bay until it is seated in the connector. 2. Using a Phillips-head screwdriver, tighten the captive screw at the top of the enclosure services module to secure the module to the chassis. 3. Repeat steps 1 and 2 to install the remaining enclosure services module. Install the Cooling Fans NOTICE: In a nonredundant system, install the cooling-fan blank in the same cooling-fan bay from which it was removed. NOTE: In a redundant storage system, there are three cooling fans. In a nonredundant storage system there are two cooling fans and one cooling-fan blank. Because a cooling fan and a cooling-fan blank are installed in the same manner, both components are referred to as a cooling fan in this procedure. To install the cooling fans, perform the following steps: 1. Carefully slide the cooling fan into the empty cooling-fan bay. Push the cooling fan all the way to the back of the bay until it is seated in the connector. 2. Using a Phillips-head screwdriver, turn the two captive screws clockwise until the cooling fan is secured to the cooling-fan bay. 3. Repeat steps 1 and 2 to install the remaining cooling fans. Install the Power Supplies NOTICE: In a nonredundant system, install the power supply and the power-supply blank in the same power-supply bays from which they were removed. NOTE: In a redundant storage system, there are two power supplies. In a nonredundant storage system there is one power supply and one power-supply blank. Because a power supply and a power-supply blank are installed in the same manner, both components are referred to as a power supply in this procedure. To install the power supplies, perform the following steps: 1. Carefully slide the power supply into the empty power-supply bay. Push the power supply all the way to the back of the bay until it is seated in the connector. 2. Using a Phillips-head screwdriver, turn the two captive screws clockwise until the new power supply is secured to the power-supply bay. 3. Repeat steps 1 and 2 to install the remaining power supply. 12 Dell PowerVault 2xxS Storage Systems SCSI Backplane Board Replacement Instructions
-
 1
1 -
2
-
3
-
4
-
5
-
6
-
 7
7 -
 8
8 -
 9
9 -
 10
10 -
 11
11 -
 12
12 -
 13
13 -
 14
14
 |
 |