Dell PowerVault 530F Rack Installation Guide - Page 28
Installation and, Troubleshooting Guide, s Guide, System, Administrator
 |
View all Dell PowerVault 530F manuals
Add to My Manuals
Save this manual to your list of manuals |
Page 28 highlights
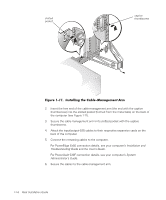
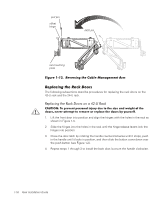
slotted pocket captive thumbscrew 2. Insert the free end of the cable-management arm (the end with the captive thumbscrew) into the slotted pocket (formed from the metal tabs) on the back of the computer (see Figure 1-11). 3. Secure the cable-management arm in its slotted pocket with the captive thumbscrew. 4. Attach the input/output (I/O) cables to their respective expansion cards on the back of the computer. 5. Connect the remaining cables to the computer. For PowerEdge 6x50 connection details, see your computer's Installation and Troubleshooting Guide and the User's Guide. For PowerVault 530F connection details, see your computer's System Administrator's Guide. 6. Secure the cables to the cable-management arm. 1-14 Rack Installation Guide
-
 1
1 -
2
-
3
-
4
-
5
-
6
-
7
-
8
-
9
-
10
-
11
-
12
-
13
-
14
-
15
-
16
-
17
-
18
-
19
-
20
-
21
-
22
-
 23
23 -
 24
24 -
 25
25 -
 26
26 -
 27
27 -
 28
28 -
 29
29 -
 30
30 -
 31
31 -
 32
32 -
 33
33 -
34
 |
 |
