Dell PowerVault 530F Rack Installation Guide - Page 29
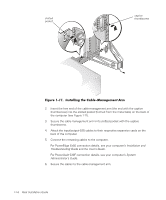
Pull the hinge away from the cable-management arm assembly.
 |
View all Dell PowerVault 530F manuals
Add to My Manuals
Save this manual to your list of manuals |
Page 29 highlights
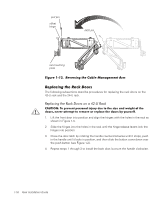
7. After connecting the cables to the computer, unscrew the thumbscrews that secure the front of the server to the front vertical rail. 8. Slide the computer forward to the fully extended position. 9. Route the cables along the cable-management arm, allowing some additional cable slack at the hinge positions, and secure the cables to the cablemanagement arm with the Velcro straps attached to the cable-management arm. 10. Slide the computer in and out of the rack to verify that the cables are routed correctly and do not bind, stretch, or pinch with the movement of the cablemanagement arm. NOTE: As you pull the computer out to its furthest extension, the slide assemblies lock in the extended position. To push the computer back into the rack, press the green locking latch on the side of the slide to release the locks, and then slide the computer completely into the rack. 1. Turn the cable-management arm over (see Figure 1-12). 2. Remove the pull pins from the offset hinge of the cable-management arm. 3. Remove the rail-mounting plate. NOTE: Make note of the orientation of the rail-mounting plate to the vertical rail. 4. Pull the hinge away from the cable-management arm assembly. 5. Position the offset hinge next to the cable-management arm assembly. 6. Replace the pull pin with the ring facing up. 7. Replace the rail-mounting plate in the same orientation to the opposite vertical rail. 8. Replace the second pull pin with the ring facing up. 9. Perform the steps to install the cable-management arm. NOTE: The opposite vertical rail and the slotted pocket on the opposite side of the cable are used for reverse installation of the cable-management arm. support.dell.com Rack Installation Guide 1-15
-
 1
1 -
2
-
3
-
4
-
5
-
6
-
7
-
8
-
9
-
10
-
11
-
12
-
13
-
14
-
15
-
16
-
17
-
18
-
19
-
20
-
21
-
22
-
23
-
 24
24 -
 25
25 -
 26
26 -
 27
27 -
 28
28 -
 29
29 -
 30
30 -
 31
31 -
 32
32 -
 33
33 -
 34
34
 |
 |
