Dell PowerVault 530F Rack Installation Guide - Page 31
and PowerVault 530F
 |
View all Dell PowerVault 530F manuals
Add to My Manuals
Save this manual to your list of manuals |
Page 31 highlights
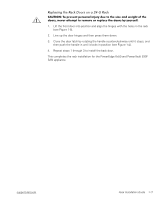
1. Lift the front door into position and align the hinges with the holes in the rack (see Figure 1-5). 2. Line up the door hinges and then press them down. 3. Close the door latch by rotating the handle counterclockwise until it stops, and then push the handle in until it locks in position (see Figure 1-4). 4. Repeat steps 1 through 3 to install the back door. This completes the rack installation for the PowerEdge 6x50 and PowerVault 530F SAN appliance. support.dell.com Rack Installation Guide 1-17
-
 1
1 -
2
-
3
-
4
-
5
-
6
-
7
-
8
-
9
-
10
-
11
-
12
-
13
-
14
-
15
-
16
-
17
-
18
-
19
-
20
-
21
-
22
-
23
-
24
-
25
-
 26
26 -
 27
27 -
 28
28 -
 29
29 -
 30
30 -
 31
31 -
 32
32 -
 33
33 -
 34
34
 |
 |

support.dell.com
Rack Installation Guide
1-17
±²Ç¿ÄŶ·¸ ¹º² ±ÄÅÆ »´´¼½ ´· Ä ÁÀÂà ±ÄÅÆ
µ¹°³´²±·¸³Å¸ÄÃÀÍÀ»¿¸ÄÀÃÁÅ»¾Æ¸º»#ÌÃ˸¼ÌÀ¸¿Å¸¿ÂÀ¸Áº!À¸¾»¼¸ÉÀºÈ¿¸Åʸ¿ÂÀ¸
¼ÅÅÃÁ"¸»ÀÍÀø¾¿¿ÀÇÄ¿¸¿Å¸ÃÀÇÅÍÀ¸ÅøÃÀÄƾ½À¸¿ÂÀ¸¼ÅÅÃÁ¸Î˸ËÅÌÃÁÀÆÊÏ
1.
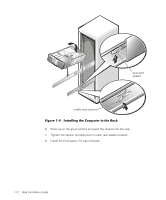
Lift the front door into position and align the hinges with the holes in the rack
(see Figure 1-5).
2.
Line up the door hinges and then press them down.
3.
Close the door latch by rotating the handle counterclockwise until it stops, and
then push the handle in until it locks in position (see Figure 1-4).
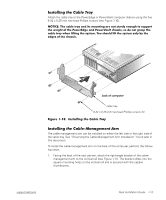
4.
Repeat steps 1 through 3 to install the back door.
This completes the rack installation for the PowerEdge 6
x
50 and PowerVault 530F
SAN appliance.