Dell Powerconnect W-ClearPass Virtual Appliances W-ClearPass Tech Note Install - Page 1
Dell Powerconnect W-ClearPass Virtual Appliances Manual
 |
View all Dell Powerconnect W-ClearPass Virtual Appliances manuals
Add to My Manuals
Save this manual to your list of manuals |
Page 1 highlights
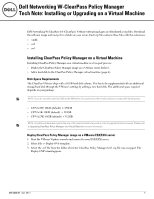
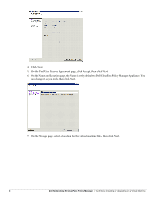
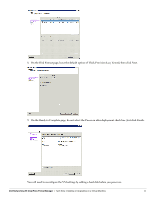
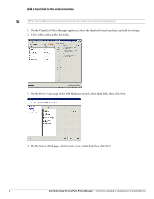
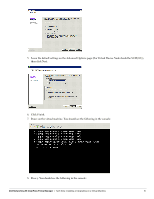
Dell Networking W-ClearPass Policy Manager Tech Note: Installing or Upgrading on a Virtual Machine Dell Networking W-ClearPass 6.0 (ClearPass) VMware software packages are distributed as zip files. Download the software image and unzip it to a folder on your server. Each zip file contains three files with the extensions: .vmdk .ovf .mf Installing ClearPass Policy Manager on a Virtual Machine Installing ClearPass Policy Manager on a virtual machine is a two-part process: Deploy the ClearPass Policy Manager image on a VMware server (below). Add a hard disk to the ClearPass Policy Manager virtual machine (page 4). Disk Space Requirements The ClearPass VMware ships with a 10GB hard disk volume. This has to be supplemented with an additional storage/hard disk through the VMware's settings by adding a new hard disk. The additional space required depends on your package. NOTE: If you do not add a new hard disk to the VM before it is powered on, then it will continue to restart with kernel panics. CP-VA-500: 10GB (default) + 250GB CP-VA-5K: 10GB (default) + 512GB CP-VA-25K: 10GB (default) + 512GB NOTE: An additional hard disk equal to the size of the new hard disk is required in order to upgrade to future versions. Please refer to Upgrading ClearPass Policy Manager on a Virtual Machine for more information. Deploy ClearPass Policy Manager image on a VMware ESX/ESXi server 1. Start the VMware Vsphere console and connect to your ESX/ESXi server. 2. Select File > Deploy OVF template. 3. Select the .ovf file from the folder where the ClearPass Policy Manager 6.0.1 zip file was unzipped. The Deploy OVF wizard appears. 0511302-01 | Apr 2013 1
-
 1
1 -
 2
2 -
 3
3 -
 4
4 -
 5
5 -
 6
6 -
 7
7 -
8
 |
 |