Dell Precision 390 Quick Reference Guide - Page 23
To avoid losing data, do not use the power button to turn - diagnostic lights
 |
View all Dell Precision 390 manuals
Add to My Manuals
Save this manual to your list of manuals |
Page 23 highlights
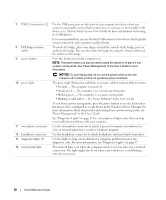
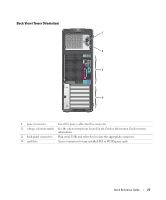
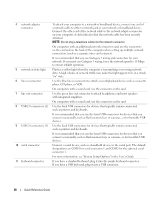
7 USB 2.0 connectors (2) 8 power button 9 power light 10 diagnostic lights (4) 11 microphone connector 12 headphone connector 13 network link light Use the USB connectors on the front of the computer for devices that you connect occasionally, such as flash memory keys or cameras, or for bootable USB devices (see "System Setup" in your User's Guide for more information on booting to a USB device). It is recommended that you use the back USB connectors for devices that typically remain connected, such as printers and keyboards. Press this button to turn the computer on. NOTE: The power button can also be used to wake the system or to place it into a power-saving mode. See "Power Management" in the User's Guide" for more information. NOTICE: To avoid losing data, do not use the power button to turn the computer off. Instead, perform an operating system shutdown. The power light illuminates and blinks or remains solid to indicate different states: • No light - The computer is turned off. • Steady green - The computer is in a normal operating state. • Blinking green - The computer is in a power-saving mode. • Blinking or solid amber - See "Power Management" in the User's Guide." To exit from a power-saving mode, press the power button or use the keyboard or the mouse if it is configured as a wake device in the Windows Device Manager. For more information about sleep modes and exiting from a power-saving mode, see "Power Management" in the User's Guide for more information. See "Diagnostic Lights" on page 37 for a description of light codes that can help you troubleshoot problems with your computer. Use the lights to help you troubleshoot a computer problem based on the diagnostic code. For more information See "Diagnostic Lights" on page 37. Use the microphone connector to attach a personal computer microphone for voice or musical input into a sound or telephony program. Use the headphone connector to attach headphones and most kinds of speakers. The network light is on when the computer sends or receives data over a network connection. The light might also be on when a network device is establishing a network connection. Quick Reference Guide 23
-
 1
1 -
2
-
3
-
4
-
5
-
6
-
7
-
8
-
9
-
10
-
11
-
12
-
13
-
14
-
15
-
16
-
17
-
 18
18 -
 19
19 -
 20
20 -
 21
21 -
 22
22 -
 23
23 -
 24
24 -
 25
25 -
 26
26 -
 27
27 -
 28
28 -
29
-
30
-
31
-
32
-
33
-
34
-
35
-
36
-
37
-
38
-
39
-
40
-
41
-
42
-
43
-
44
-
45
-
46
-
47
-
48
-
49
-
50
-
51
-
52
-
53
-
54
-
55
-
56
-
57
-
58
-
59
-
60
-
61
-
62
-
63
-
64
-
65
-
66
-
67
-
68
-
69
-
70
-
71
-
72
-
73
-
74
-
75
-
76
-
77
-
78
-
79
-
80
-
81
-
82
-
83
-
84
-
85
-
86
-
87
-
88
-
89
-
90
-
91
-
92
-
93
-
94
-
95
-
96
-
97
-
98
-
99
-
100
-
101
-
102
-
103
-
104
-
105
-
106
-
107
-
108
-
109
-
110
-
111
-
112
-
113
-
114
-
115
-
116
-
117
-
118
-
119
-
120
-
121
-
122
-
123
-
124
-
125
-
126
-
127
-
128
-
129
-
130
-
131
-
132
-
133
-
134
-
135
-
136
-
137
-
138
-
139
-
140
-
141
-
142
-
143
-
144
-
145
-
146
-
147
-
148
-
149
-
150
-
151
-
152
-
153
-
154
-
155
-
156
-
157
-
158
-
159
-
160
-
161
-
162
-
163
-
164
-
165
-
166
-
167
-
168
-
169
-
170
-
171
-
172
-
173
-
174
-
175
-
176
-
177
-
178
-
179
-
180
-
181
-
182
-
183
-
184
-
185
-
186
-
187
-
188
-
189
-
190
 |
 |